
Introduction
As a React Native developer, we often encounter challenges when building complex applications, particularly when it comes to passing data in nested components and managing state. This can be time-consuming and difficult to handle. Fortunately, Redux offers a solution. In this article, we will explore the following topics in Redux In React Native:
- What is Redux
- Why Prefer Redux
- Features of Redux
- Redux Terminology
- A Counter App With Redux
- Conclusion
- Resources
So let’s get started without further delay
What is Redux?
When developing JavaScript applications using React Native, state management typically occurs at the component level and is passed around via props. However, Redux offers a more comprehensive approach where the entire state of the application is stored in a single immutable object. Any updates to the Redux state are reflected in a copy of the relevant sections of the state, along with the new change.
Why Prefer Redux?
When working with React Native applications, passing data between components can be difficult, especially when dealing with complex data flow and state management. Although props are the main method of passing data from parent to child components, it can be a challenge when components are deeply nested or widely scattered throughout the application.

Let’s analyze the diagram above, where we aim to transmit Component 1 data to Component 6. The standard method for transferring data from one component to another is through props. However, constantly passing the data through props and managing the state can become challenging and overwhelming. It’s crucial to find a more efficient solution to avoid headaches.
When faced with situations like these, Redux in React Native can be used to store data in a centralized location, making it easily accessible whenever needed. The advantages of using Redux include:
Global State Management: Redux offers a centralized store that stores the complete state of the application. This allows components to easily access or modify any portion of the state without requiring convoluted prop drilling.
Streamlined Development: Utilizing Redux for development allows for a streamlined process by eliminating the need for manual state management between components. This leads to code that is easier to maintain and keep organized.
Features of Redux
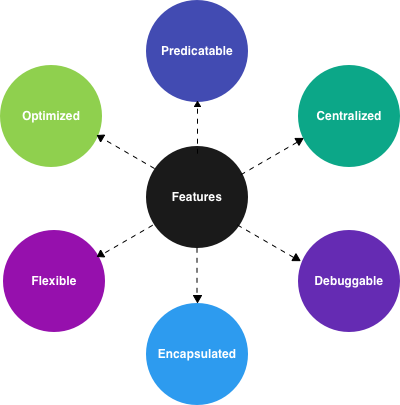
Redux has many features. Some features of redux are listed below,
Predictable: This feature ensures that behavior remains consistent and testing is simplified across various environments, including client, server, and native.
Centralized: The centralization of an application’s state and logic provides powerful features such as undo/redo and state persistence.
Debuggable: The Redux DevTools make it simple to trace changes in state, debug through time-traveling, and report errors efficiently to servers.
Flexible: Integrates smoothly with any user interface and provides a wide range of extensions to cater to various project requirements.
Encapsulated: By utilizing defined APIs, components can seamlessly communicate with the Redux store without the need for redundant code..
Optimized: This system uses advanced performance optimizations, ensuring that re-renders occur only when necessary, resulting in a highly efficient user interface.
Redux Terminology

You can see in the above diagram how redux works. Let’s try to understand this diagram with a real-life example,
Suppose a person Salar went to the market to buy some vegetables and came back to the house and asked his wife Imama to keep the vegetables in the refrigerator so Salar could use them as needed. Let’s examine this straightforward scenario from a distance,
- Action: Salar’s instruction to keep the vegetables in the refrigerator is like a Redux action. It’s a simple command.
- Reducer: Imama, Salar’s wife, acts as the Redux reducer. She follows the instructions and puts the vegetables in the refrigerator.
- Store: The refrigerator itself is like the Redux store. It holds the vegetables until Salar needs them later.
A Counter App With Redux
Let’s begin by creating a basic counter application using redux. Join me in following these steps to build it.
Step 1: Project Creation
The first step is to create a new project using the following command:
npx react-native init counterappStep 2: Package Installation
Let’s first install the necessary packages for the application. You can install the packages using the following command,
Using npm
#necessary packages for redux
npm install redux
npm install react-redux
npm install @reduxjs/toolkit
#installing these extra packages for native base and icon
npm install react-native-safe-area-context
nom install react-native-svg
npm install react-native-vector-icons
npm install native-baseUsing yarn
#necessary packages for redux
yarn add redux
yarn add react-redux
yarn add @reduxjs/toolkit
# installing these extra packages for native base and icon
yarn install react-native-safe-area-context
yarn install react-native-svg
yarn install react-native-vector-icons
yarn install native-base
Step 3: Create Files & Folder Structure
The structure of the files and project folders should be created as shown in the following image,
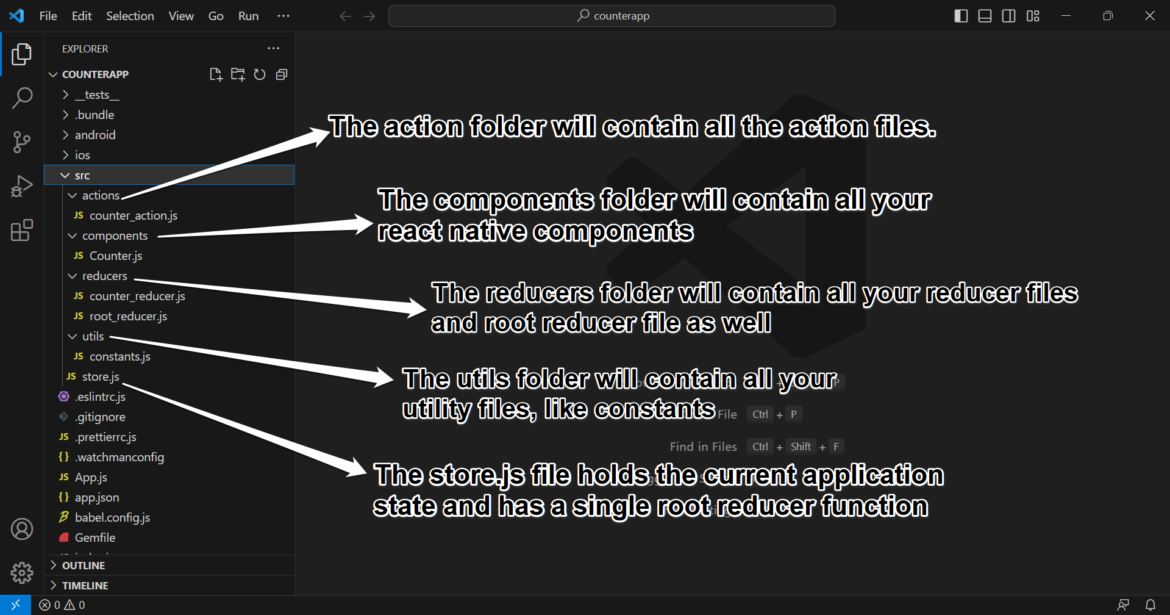
Step 4: Create Constants
Let’s create constants for action types.
//Location: src/utils/constants.js
export const ADD_NUMBER = 'add_number';
export const SUBSTRACT_NUMBER = 'substract_number';
Step 5: Create Action
You may be wondering what an action is if you recall the story above where Salar instructed his wife to keep the vegetables in the refrigerator. Technically, we can say the same thing as,
A Redux action sends data from your application to the store. Normally, an action consists of two properties: its type and its payload (if it’s included). The “type” refers to an uppercase string that is assigned to a constant and describes an action. The “payload” is extra data that can be included.
//Location: src/actions/counter_action.js
import { ADD_NUMBER, SUBSTRACT_NUMBER } from '../utils/constants';

export function incrementCount() {
    return {
        type: ADD_NUMBER,
    }
}

export function decrementCount() {
    return {
        type: SUBSTRACT_NUMBER,
    }
}
Step 6: Create Reducer
You may be wondering what “Reducer” means. As we discussed earlier in the story, Imama (Salar’s wife) serves as the Redux reducer. She follows the instructions and puts the vegetables in the refrigerator. Technically speaking, this can be described as follows:
A reducer is a specialized function that has two parameters – state and action. It is immutable, meaning it cannot be modified, and always returns a duplicate of the whole state. Usually, a reducer comprises a switch statement that examines all possible action types.
//Location: src/reducers/counter_reducer.js
import { ADD_NUMBER, SUBSTRACT_NUMBER } from '../utils/constants';

export const counterReducer = (state = { count: 0 }, action) => {
    switch (action.type) {
        case ADD_NUMBER:
            return {
                ...state,
                count: state.count + 1
            }
        case SUBSTRACT_NUMBER:
            return {
                ...state,
                count: state.count - 1
            }
        default:
            return state;
    }
}
To proceed, it’s time to create a root reducer. Your project may have multiple reducers, but the root reducer will consolidate all of them in one place.
Location: src/reducers/root_reducer.js
import {combineReducers} from 'redux';
import { counterReducer } from './counter_reducer';

const rootReducer = combineReducers({
    counterReducer
})

export default rootReducer;
Step 7: Create Store
In the story above, we saw how the refrigerator served as a central hub for storing vegetables. From a technical perspective, we can summarize it as follows:
The Redux application state resides in the store, which is initialized with a reducer.
Location: src/store.js
import {configureStore} from '@reduxjs/toolkit';
import rootReducer from './reducers/root_reducer';


const store = configureStore({
    reducer: rootReducer //pass the root reducer in the reducer parm
})

export default store;
Step 8: Create View (For Functional Component)
Before creating a counter component, it’s important to first understand the two hooks of React Redux.
useDispatch()
The useDispatch hook in React Redux allows components to easily trigger actions and update the Redux store without the need for complex setup or passing functions as props. This simplifies the process of dispatching actions in functional components.
useSelector()
The useSelector hook in React Redux is utilized to extract and access data from the Redux store in functional components. This simplifies the process of managing state access and subscriptions in React applications. With this hook, components can easily choose and subscribe to specific parts of the state.
//Location: src/components/Counter.js
import { Text, StyleSheet, View } from 'react-native';
import { Fab } from 'native-base';
import MaterialCommunityIcons from 'react-native-vector-icons/MaterialCommunityIcons';
import { incrementCount, decrementCount } from '../actions/counter_action';
import { useDispatch, useSelector } from 'react-redux';


export default function Counter() {

    const dispactch = useDispatch();
    const count = useSelector((state) => state.counterReducer.count);

    const increment = () => {
        dispactch(incrementCount());
    }

    const decrement = () => {
        dispactch(decrementCount());
    }

    return (
        <View style={styles.mainContainer}>
            <View style={styles.counterMainContainer}>
                <View style={styles.counterContainer}>
                    <Text style={styles.textStyle}>{count}</Text>
                </View>
            </View>

            <View>
                <Fab
                    placement="bottom-right"
                    colorScheme="blue"
                    size="lg"
                    icon={<MaterialCommunityIcons name="minus" size={26} color="white" />}
                    onPress={decrement}
                />
                <Fab
                    placement="bottom-left"
                    colorScheme="blue"
                    size="lg"
                    icon={<MaterialCommunityIcons name="plus" size={26} color="white" />}
                    onPress={increment}
                />

            </View>
        </View>
    )
}

const styles = StyleSheet.create({
    mainContainer: {
        alignSelf: 'center'
    },

    counterMainContainer: {
        flex: 1,
        flexDirection: 'column',
        justifyContent: 'center'
    },

    counterContainer: {
        justifyContent: 'center',
        alignItems: 'center',
        width: 200,
        height: 200,
        backgroundColor: 'white',
        borderRadius: 100,

    },
    textStyle: {
        fontSize: 40,
        color: 'black',
        fontWeight: 'bold'

    }
})
Step 9: Create View (For Class Component)
If you feel confident working with class components, then you can skip step 8. When it comes to React Redux, there are other hooks available for class components. Let’s talk about those before we proceed any further
mapStateToProps()
In React Redux, the hook called mapStateToProps connects a component to the Redux store. This allows the component to easily access and update specific parts of the state using the useSelector hook. By simplifying data retrieval and keeping the component in sync with the store, it makes the process more efficient.
mapDispatchToProps()
In React Redux, the hook mapDispatchToProps connects a component to the Redux store. This allows the component to dispatch actions and update the state effortlessly using the ‘useDispatch’ hook.
connect()
The connect hook is utilized to connect a component to the Redux store. This is done by implementing mapStateToProps and/or mapDispatchToProps functions, which enable the component to efficiently access the state and dispatch actions. This simplifies the interaction with the Redux store and guarantees that the component remains in sync with the state
To learn more about these hooks, please visit the following link: https://react-redux.js.org/api/connect
//Location: src/components/Counter.js
import { Text, StyleSheet, View } from 'react-native';
import React, { Component } from 'react';
import { Fab } from 'native-base';
import MaterialCommunityIcons from 'react-native-vector-icons/MaterialCommunityIcons';
import { incrementCount, decrementCount } from '../actions/counter_action';
import { connect } from 'react-redux';

function mapStateToProps(state) {
    return {
        count: state.counterReducer.count
    }
}

function mapDispatchToProps(dispatch) {
    return {
        increment: () => dispatch(incrementCount()),
        decrement: () => dispatch(decrementCount()),
    };
}

class Counter extends Component {

    constructor(props) {
        super(props);

    }

    render() {
        return (
            <View style={styles.mainContainer}>
                <View style={styles.counterMainContainer}>
                    <View style={styles.counterContainer}>
                        <Text style={styles.textStyle}>{this.props.count}</Text>
                    </View>
                </View>

                <View>
                    <Fab
                        placement="bottom-right"
                        colorScheme="blue"
                        size="lg"
                        icon={<MaterialCommunityIcons name="minus" size={26} color="white" />}
                        onPress={this.props.decrement}
                    />
                    <Fab
                        placement="bottom-left"
                        colorScheme="blue"
                        size="lg"
                        icon={<MaterialCommunityIcons name="plus" size={26} color="white" />}
                        onPress={this.props.increment}
                    />

                </View>
            </View>
        )
    }
}

const styles = StyleSheet.create({
    mainContainer: {
        alignSelf: 'center'
    },

    counterMainContainer: {
        flex: 1,
        flexDirection: 'column',
        justifyContent: 'center'
    },

    counterContainer: {
        justifyContent: 'center',
        alignItems: 'center',
        width: 200,
        height: 200,
        backgroundColor: 'white',
        borderRadius: 100,

    },
    textStyle: {
        fontSize: 40,
        color: 'black',
        fontWeight: 'bold'

    }
})


export default connect(mapStateToProps, mapDispatchToProps)(Counter);
Step 10: Create Redux Wrapper
We are almost done. We just need to wrap the react native main component around the redux provider. To do this, we need to create a React Redux provider where we can pass the store and keep the main app component inside the provider.
//Location: index.js
import {AppRegistry} from 'react-native';
import App from './App';
import {name as appName} from './app.json';
import {Provider} from 'react-redux';
import store from './src/store';


const AppRedux = () => (
    <Provider store={store}>
        <App />
    </Provider>
)


AppRegistry.registerComponent(appName, () => AppRedux);
Step 11: Wrap App Component
For this project, I am using the Native Base library, which requires us to wrap the main App component inside the NativeBaseProvider. If you are not using the native base library for your project then you can skip this step.
//Location: App.js
import React, { Component } from 'react';
import { View } from 'react-native';
import Counter from './src/components/Counter';
import { NativeBaseProvider } from 'native-base';

export default class App extends Component {
  render() {
    return (
      <NativeBaseProvider>
        <View>
          <Counter />
        </View>
      </NativeBaseProvider>

    )
  }
}
You’re all set! Go ahead and run your app to start playing with it.

The source code can be downloaded from the GitHub link provided below.
Counter app with class component: https://github.com/socialmad/counterapp_redux_class_component
Counter app with functional component: https://github.com/socialmad/counterapp_redux_functional_component
Conclusion
To sum up, Redux in React Native proves to be a valuable tool for developers who aim to efficiently manage state and data flow in complex applications. It allows for better code organization, improved performance, and an overall enhanced development experience. With Redux, developers can easily access and modify the global state, resulting in the creation of scalable, maintainable, and debuggable applications. However, it is important to note that not every project requires Redux. Depending on the project’s complexity and use case, developers can make an informed decision on whether to use it or not. Thank you for taking the time to read this. If you have any questions, please don’t hesitate to reach out to me on LinkedIn.
Resources:
- https://redux.js.org/
- https://react-redux.js.org/
- https://react-redux.js.org/api/hooks
- https://react-redux.js.org/api/connect
- https://www.taniarascia.com/redux-react-guide/
- https://github.com/socialmad/counterapp_redux_functional_component
- https://github.com/socialmad/counterapp_redux_class_component