Salesforce Streaming API enables streaming of events using push technology and provides a subscription mechanism for receiving events in near real time. The Salesforce Streaming API subscription mechanism supports multiple types of events, including PushTopic events, generic events, platform events, and Change Data Capture events.
Where do we use it??
Salesforce Streaming API is used when you need to keep your external source in sync with the Salesforce data with PushTopic events and Change Data Capture events. Salesforce Streaming API lets you process business logic in an external system in response to data changes in Salesforce. We can use Salesforce Streaming API to broadcast custom notifications with platform events and generic streaming.
How does it work??
The Salesforce Streaming API uses a publisher-subscriber (pub/sub) model to push data to the client. The first thing a developer must do is set up a PushTopic in Salesforce. This is basically a query that watches for changes in values of certain fields in a Salesforce Object. Then the client can subscribe to that PushTopic and receive updates whenever a change is made to the specified fields. This is done using a push protocol called the Bayeux protocol. The Salesforce implementation uses long polling connections to the server that will be able to notify the client on changes. This differs from traditional polling in that it keeps an incoming request open until an event is fired and then sends the response.
How this works??
An HTTP request is made to the server. Instead of responding immediately, the server keeps the request and waits for a specific event to fire, in our case a change in one of the fields of our PushTopic object. When the event is fired a response is made. Then the client makes another request to the server which it keeps open and waits. This ends up looking something like this:

To know more about working of Salesforce Streaming API please refer to this link.
Real-Time Application
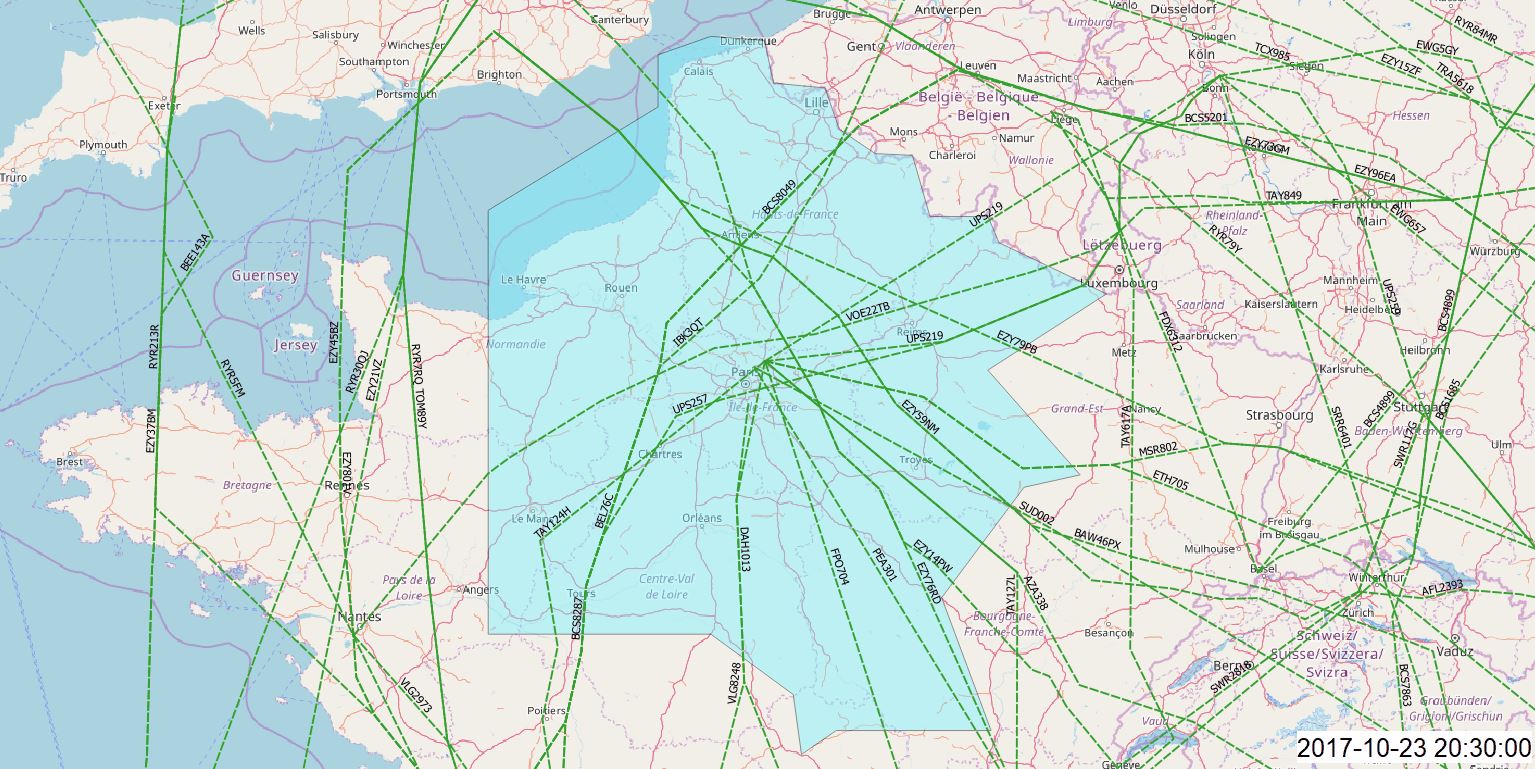
Live Tracking of flight’s actual route using Streaming API
The aviation industry and more specifically the Air Traffic Management (ATM) industry has seen a substantial push towards modernizing the way in which data is managed and shared across borders. There is an increasing wealth of data being made available each day through both commercial and authoritative aviation sources, with the demand for access to this data growing alongside it. Although the data is being made available, it often comes in different formats and through different technologies – making it difficult to consume by the end user. By mitigating this pain and making data accessible through easy to use APIs ( Application Programming Interfaces), it becomes a lot easier for users to unlock the potential value of the data within new exciting and innovative applications for stakeholders across the ATM industry.
The Rest and Streaming APIs offer easy access to harmonized data but based on the way to consume the data by the user we use the most appropriate API as per the requirement. In this blog, we’ll briefly cover the difference between REST and Streaming APIs and then illustrate how each can be applied and used to answer key operational use cases within the aviation and ATM industry.
REST API

A Representational State Transfer(REST) API is a web service that follows a request-response pattern. The user will make an individual request for information from the REST API and receive the appropriate data in a single response. After the response is sent back to the user, the connection closes only to be re-opened when the user makes another request to the API. REST APIs are perfect for users wanting a “snapshot” of data where the information does not change very frequently.
REST API demonstrating a snapshot of information – planned routes in LFFF FIR in the next 30 minutes.
Streaming API

Streaming APIs maintain a persistent connection that continuously sends updated data to the user until the connection is terminated. Streaming APIs are perfect when a user needs to consume a constant flow of rapidly updating live data. The server repeatedly sends responses back with updated information until the connection is eventually closed by the user.

Streaming API Salesforce live tracking a flight’s actual route VS. expected route – from Paris Charles de Gaulle airport to London Gatwick airport.
So if you are a developer building an application targeting demand and capacity prediction, or are interested in knowing how many flights were completed at the end of each day for a given airport, Request-Response / REST APIs are perfectly adequate. Using REST APIs facilitates answers on demand by providing the user with the specific information they need right away.
On the other hand, if you are looking to build applications using frequently updated real-time flight information, using REST APIs can result in complex multi-threaded applications that rely on heavy computing resources in order to run and keep up with information in real time. Streaming APIs are the perfect answer to this obstacle, as they provide an easy access point to live real-time information while offering low latency. While one data access method may suit a specific use-case, there is ultimately no right or wrong way to access data – both methods are proven to work for different stakeholders looking to solve different problems within the aviation space.
Example: Interactive Visualforce Page Without Replay
The interactive Visualforce example shows you how to implement Streaming API from a Visualforce page. The sample uses the Dojo library and CometD to subscribe to PushTopic events.
On the Visualforce page, you enter the name of the PushTopic channel you want to subscribe to and click Subscribe to receive notifications on the page. Click Unsubscribe to unsubscribe from the channel and stop receiving notifications.
The Streaming API can be accessed in either of these four editions: Developer Edition, Enterprise Edition, Unlimited Edition, or Performance Edition.
Prerequisites:
Before getting started you need to enable API access to the particular org in which you are going to implement.
The “API Enabled” permission must be enabled. This permission is enabled by default but may have been changed by an administrator.
The “Streaming API” permission must be enabled.
a) Goto Setup. Enter User Interface in Quick Find Box, then select User Interface.
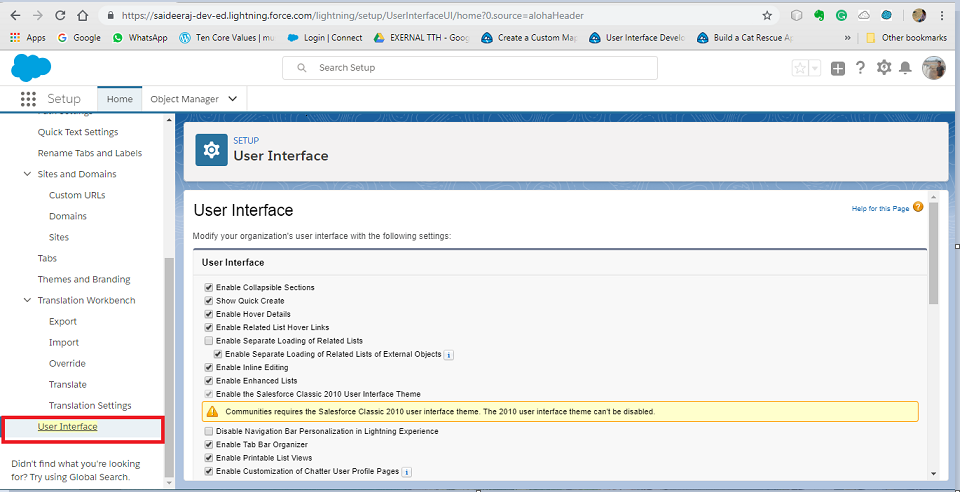
b) Scroll down to Setup in User Interface and Check the Checkbox “ Enable Streaming API”.
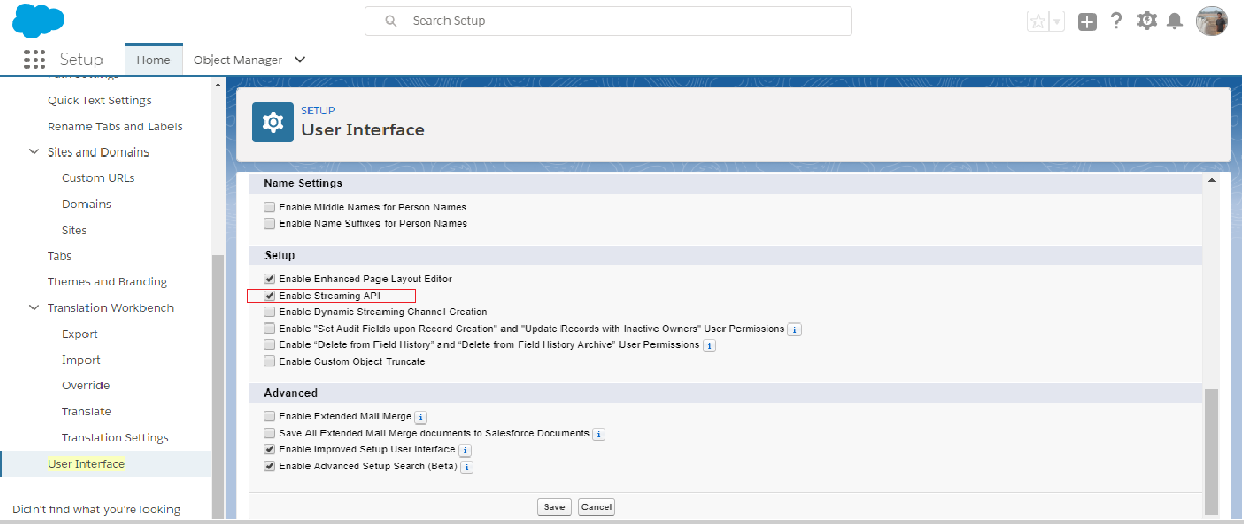
c) Click on Save.
- The logged-in user must have “Read” permission on the PushTopic standard object to receive notifications.
- The logged-in user must have “Create” permission on the PushTopic standard object to create and manage PushTopic records.
- The logged-in user must have “Author Apex” permissions to create a PushTopic by using the Developer Console.
To check the above-said permissions enabled to your user.
d) Goto Setup, enter Users in the Quick Find Box, then select Users.
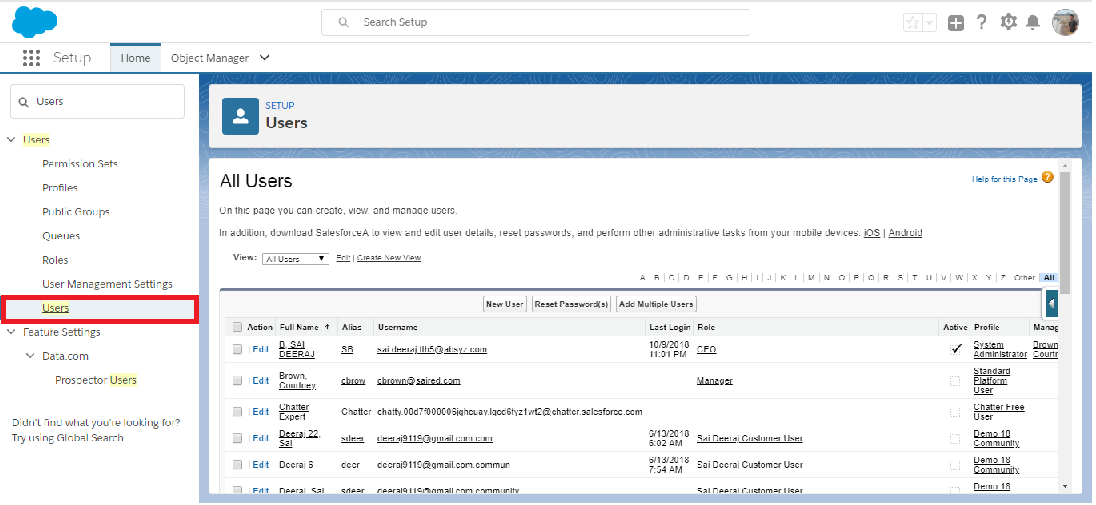
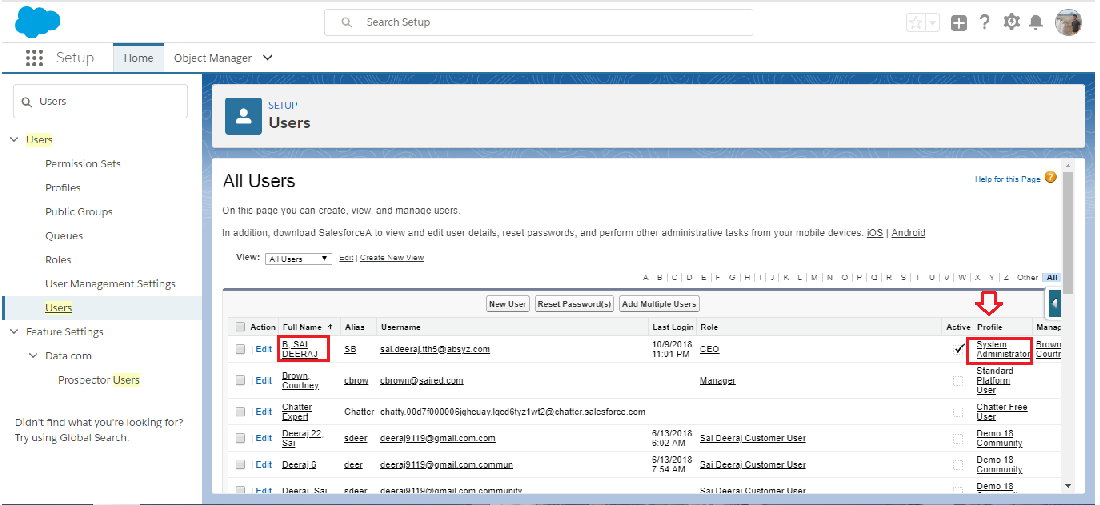
To view the permissions of the user. Goto the user on which you are going to perform the action and click on the Profile of the User.
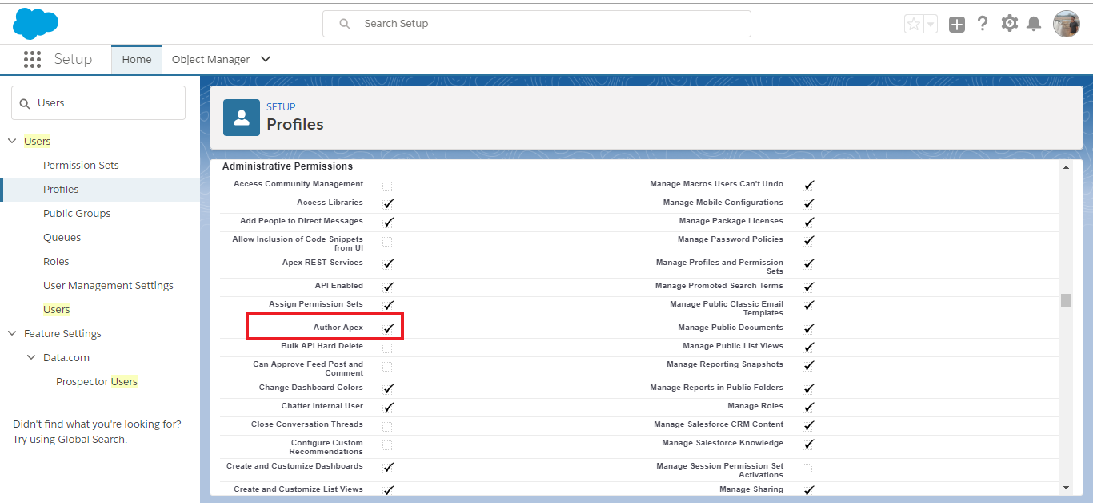
Scroll down to Administrative Permissions of that Profile and Check whether the “Author Apex” is checked or not. If not then Click on Edit on top of the Page and Check it.
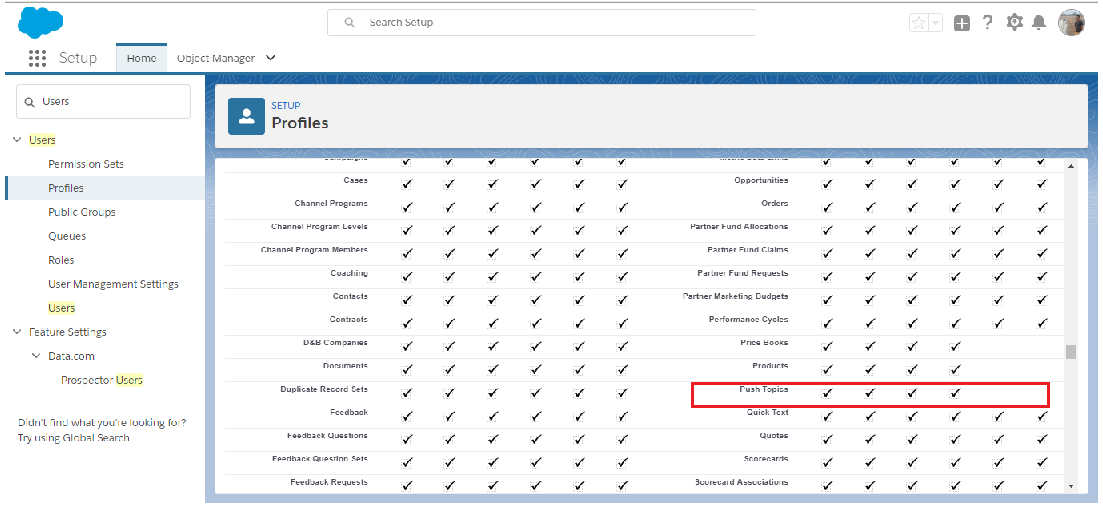
In the same way, Check for Read and Create permissions on the “PushTopics Object” under Standard Objects Permissions in the Profile of the User.
IMPLEMENTATION:
1. CREATE AN OBJECT :
a) From your management settings for custom objects, select Create | Custom Object.
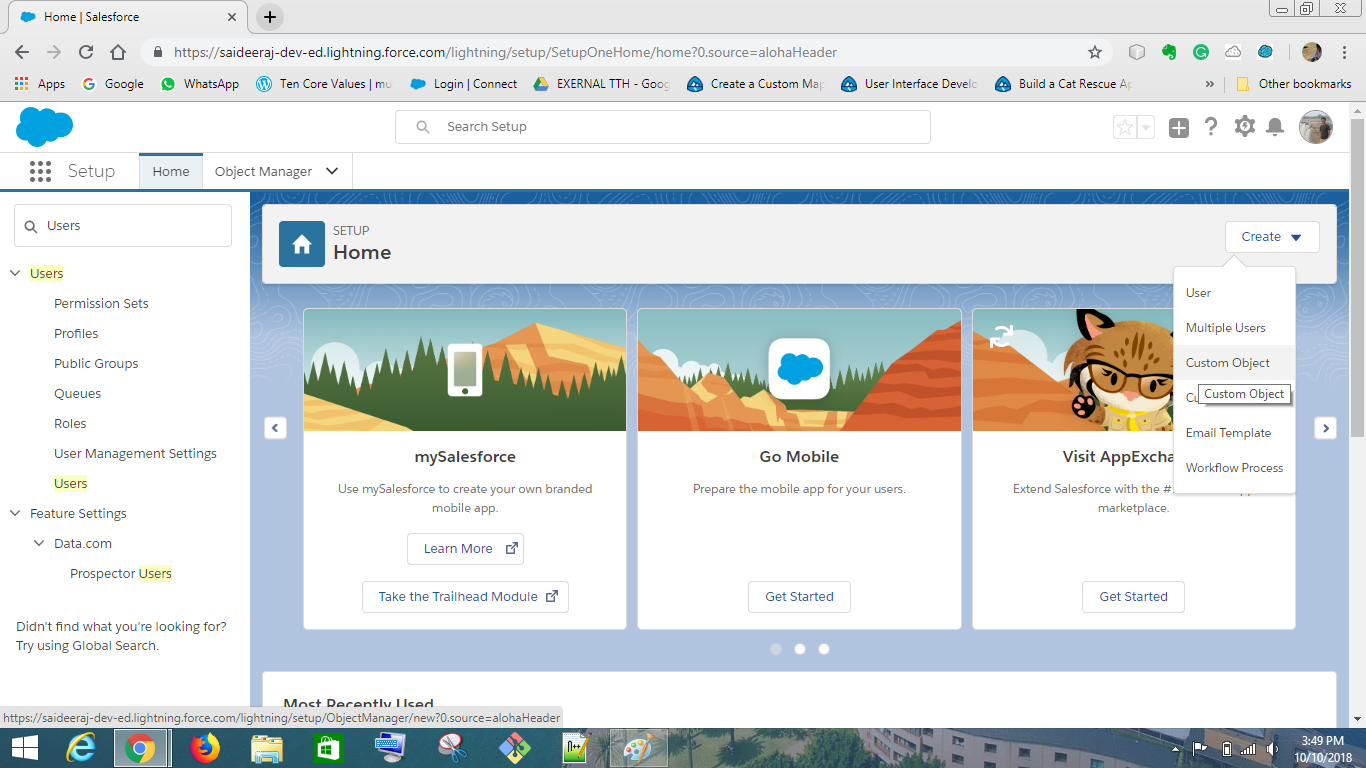
b) Define the custom object.
- In the Label field, type Invoice Statement.
- In the Plural Label field, type Invoice Statements.
- Select Starts with vowel sound.
- In the Record Name field, type Invoice Number.
- In the Data Type field, select Auto Number.
- In the Display Format field, type INV-{0000}.
- In the Starting Number field, type 1.
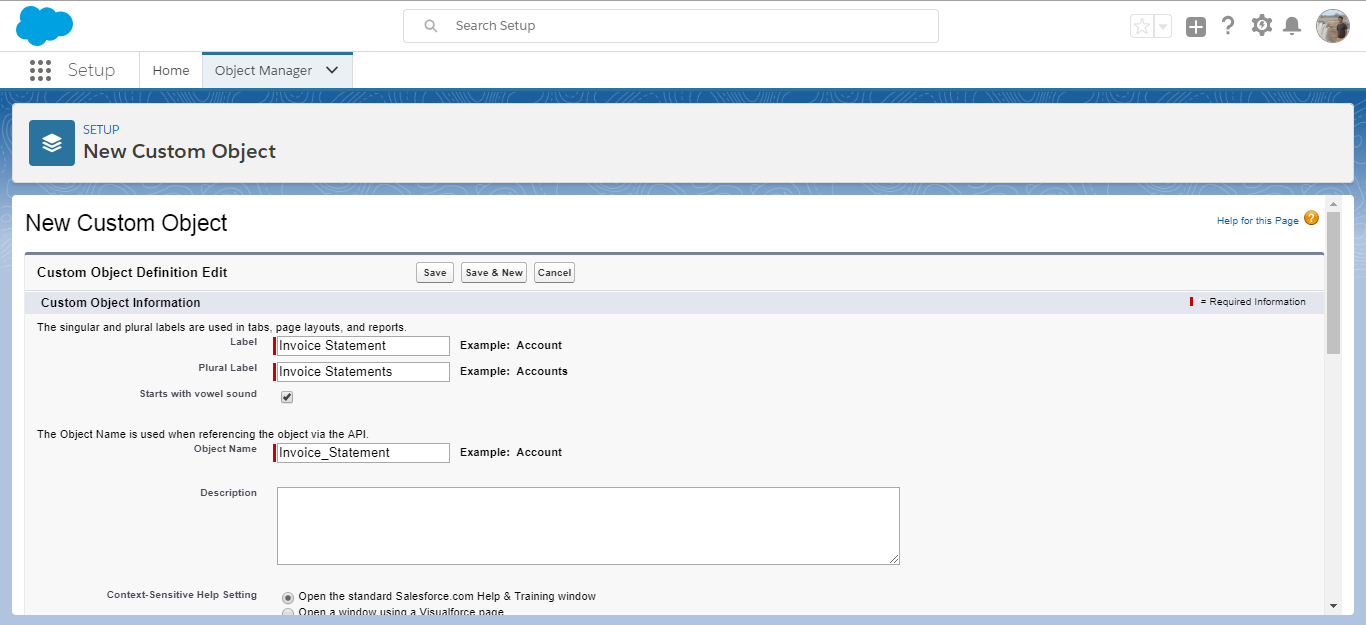
c) Click Save.
d) Add a Status field.
- Scroll down to the Custom Fields & Relationships related list and click New.
- For Data Type, select Picklist and click Next.
- In the Field Label field, type Status.
- Type the following picklist values in the box provided, with each entry on its own line.
Open
Closed
Negotiating
Pending - Select the checkbox for Use first value as a default value.
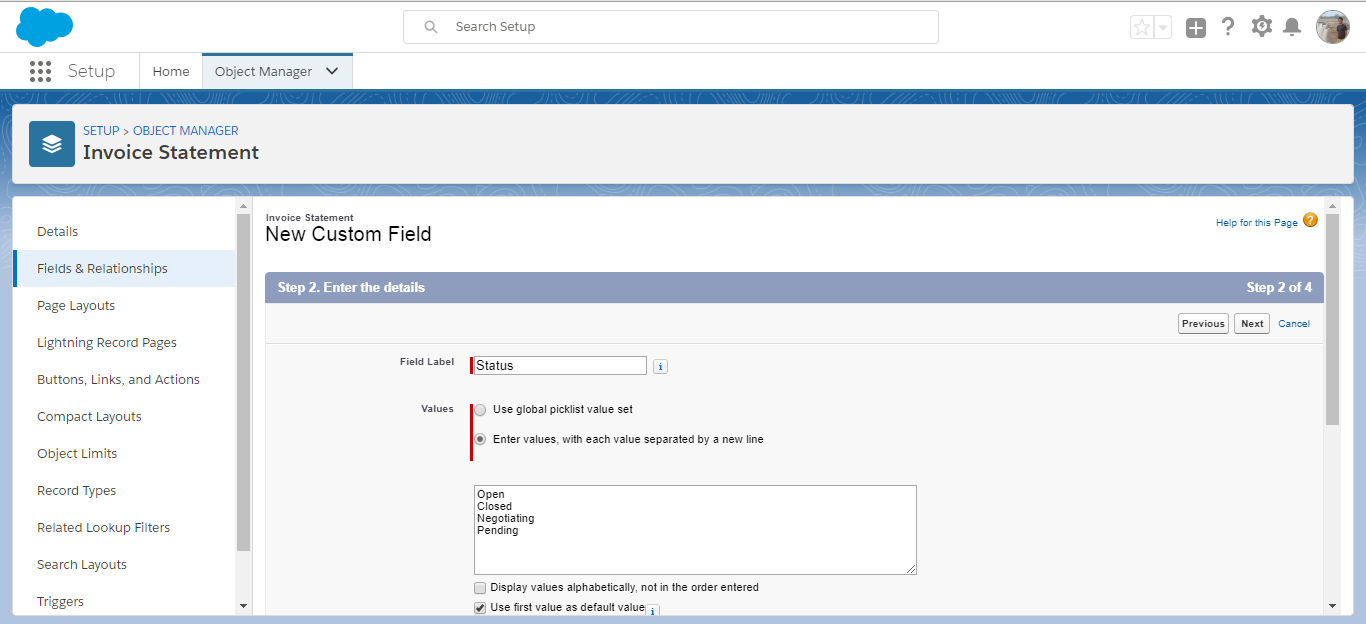
- Click Next.
- For field-level security, select Read Only and then click Next.
- Click Save & New to save this field and create a new one.
e) Now create an optional Description field.
- In the Data Type field, select Text Area and click Next.
- In the Field Label and Field Name fields, enter Description.
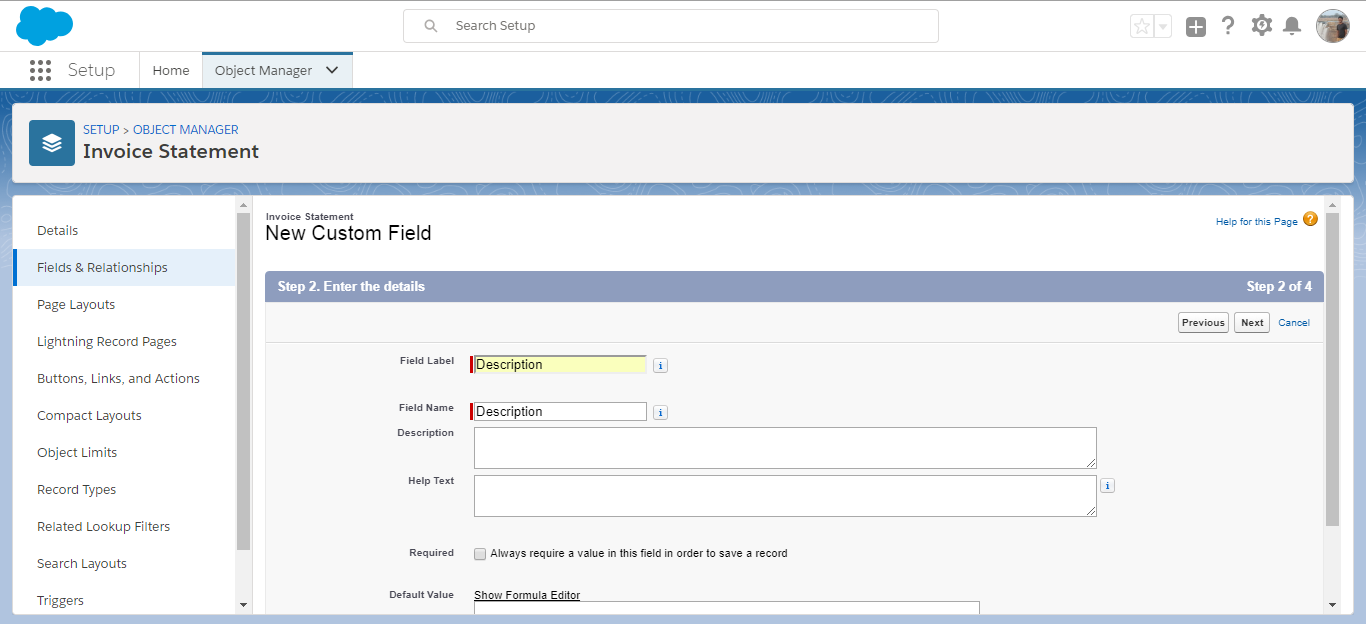
- Click Next, accept the defaults and click Next again.
- Click Save to go the detail page for the Invoice Statement object.
Your Invoice Statement object should now have two custom fields.
2. CREATE A PUSHTOPIC:
- Open the Developer Console.
- Click Debug | Open Execute Anonymous Window.
- In the Enter Apex Code window, paste in the following Apex code, and click Execute.
[sourcecode language=”java”]
PushTopic pushTopic = new PushTopic();
pushTopic.Name = ‘InvoiceStatementUpdates’;
pushTopic.Query = ‘SELECT Id, Name, Status__c, Description__c FROM Invoice_Statement__c’;
pushTopic.ApiVersion = 44.0;
pushTopic.NotifyForOperationCreate = true;
pushTopic.NotifyForOperationUpdate = true;
pushTopic.NotifyForOperationUndelete = true;
pushTopic.NotifyForOperationDelete = true;
pushTopic.NotifyForFields = ‘Referenced’;
insert pushTopic;
[/sourcecode]
3. CREATE THE STATIC RESOURCES:
- Download this static resource .zip file: streaming_api_interactive_visualforce_demo-v40.zip
- Extract the zip file. Then go to Static resources and add them there.
- From Setup, enter Static Resources in the Quick Find box, then select Static Resources.
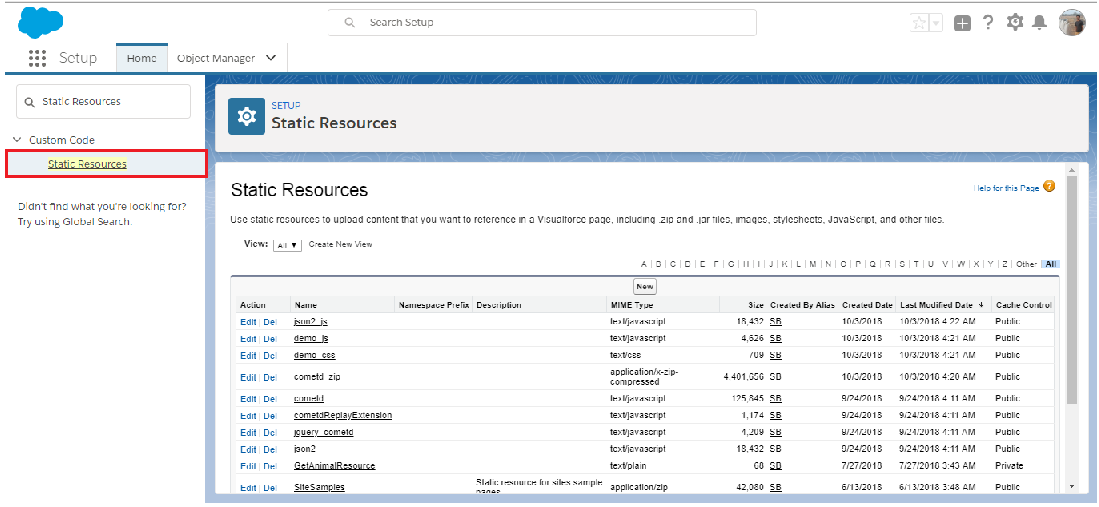
- To create a new Static Resource. Click on “ New”. Then enter the name and attach the following file:
a) cometd.zip: Files for CometD version 3.1.0 and the Dojo toolkit used by demo.js. When you define a .zip archive file as a static resource, Visualforce can access the files in that archive. The .zip file becomes a virtual file system.
Static Resource Name:
cometd_zip 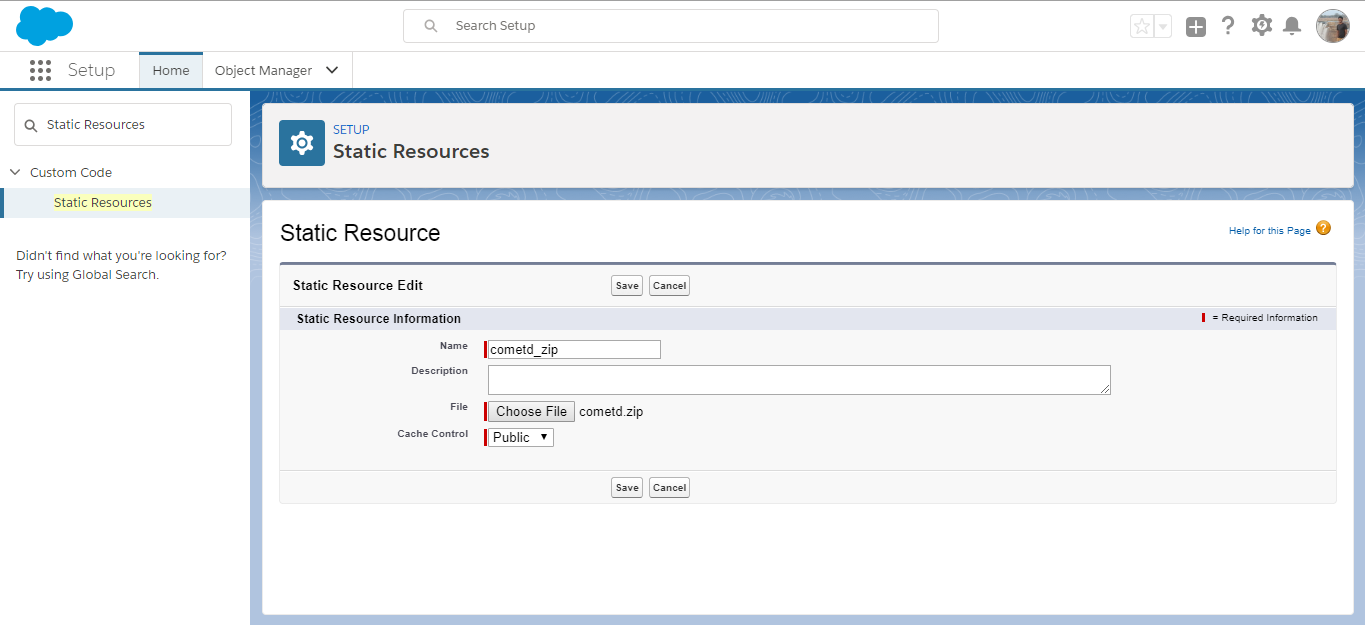
Set the Cache-Control to “Public” and Click on Save.
Repeat the same steps for the following files:
b) demo.css : The CSS code that formats the Visualforce page.
Static Resource Name: demo_css
c) demo.js: The code used by the page to subscribe to the channel, receive and display the notifications, and unsubscribe from the channel.
Static Resource Name: demo_js
d) json2. js: The JavaScript library that contains the stringify and parse methods.
Static Resource Name: json2_js
4. CREATE A VISUALFORCE PAGE:
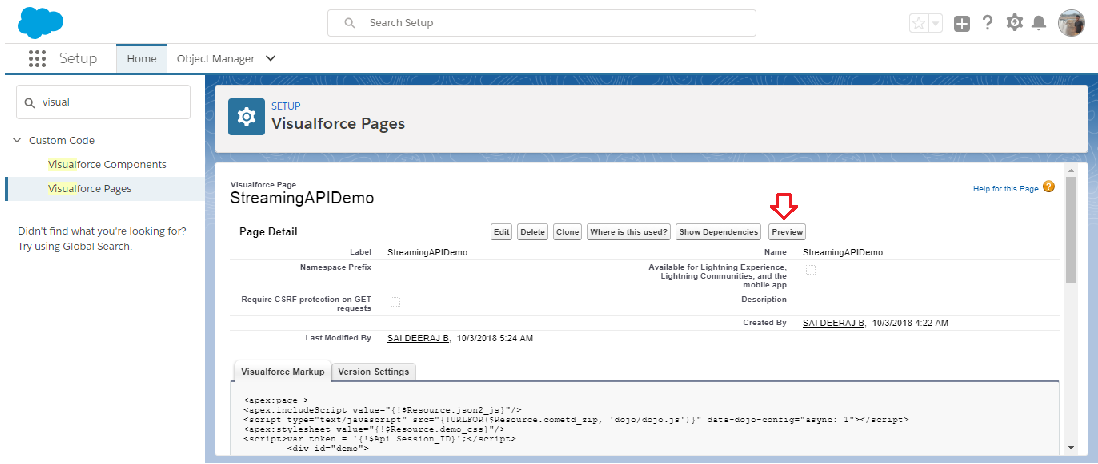
- From Setup, enter Visualforce Pages in the Quick Find box, then select Visualforce Pages.
- Click New.
- In the Label field, enter the name of the page StreamingAPIDemo.
- Replace the code in the page with the code from the StreamingApiDemo file that you downloaded.
- Click Save to save the page.
[sourcecode language=”java”]<apex:page >
<apex:includeScript value=”{!$Resource.json2_js}”/>
<script type=”text/javascript” src=”{!URLFOR($Resource.cometd_zip, ‘dojo/dojo.js’)}” data-dojo-config=”async: 1″></script>
<apex:stylesheet value=”{!$Resource.demo_css}”/>
<script>var token = ‘{!$Api.Session_ID}’;</script>
<div id=”demo”>
<div id=”datastream”></div>
<script type=”text/javascript” src=”{!$Resource.demo_js}”>
</script><div id=”input”>
<div id=”join”>
<table>
<tbody>
<tr>
<td> </td>
<td> Enter Topic Name </td>
<td>
<input id=”topic” type=”text” />
</td>
<td>
<button id=”subscribeButton”
class=”button”>Subscribe</button>
</td>
</tr>
</tbody>
</table>
</div>
<div id=”joined”>
<table>
<tbody>
<tr>
<td>
<button id=”leaveButton”
class=”button”>Unsubscribe</button>
</td>
</tr>
</tbody>
</table>
</div>
</div>
</div>
</apex:page>
[/sourcecode]
5. TEST THE PUSHTOPIC CHANNEL:
- To load the Visualforce page in a web browser, click Preview on the Visualforce page editor:
- In the text box, enter the channel name: /topic/InvoiceStatementUpdates
.
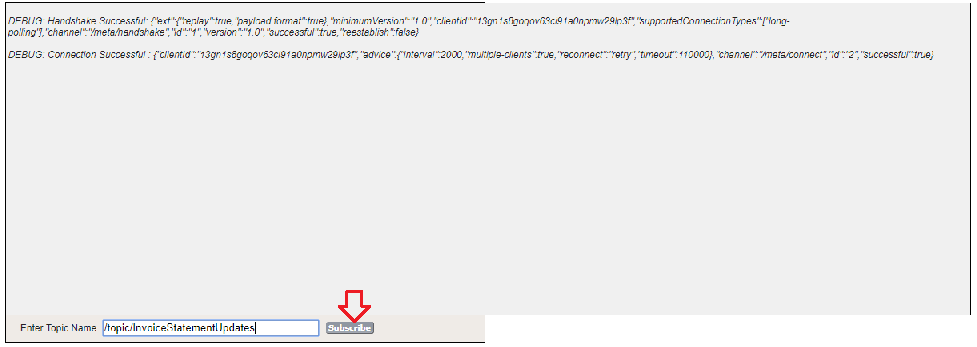
- To subscribe to the channel, click Subscribe.
- Create an InvoiceStatement in a different browser tab.
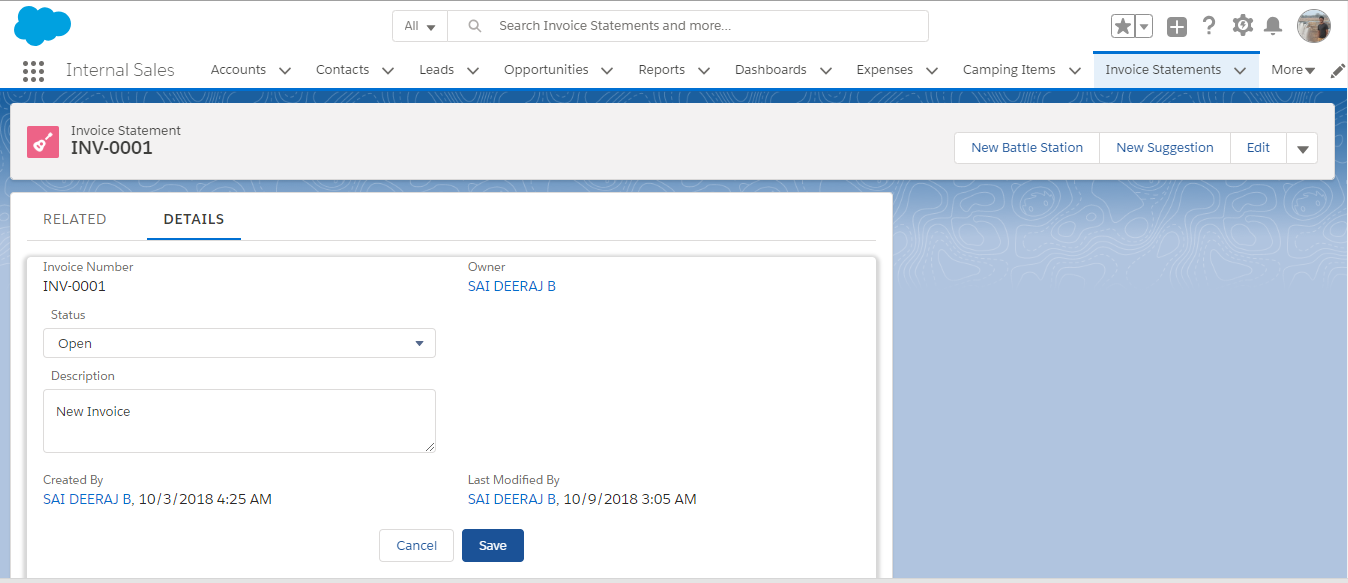 The page displays some debug messages and event notifications. The output resembles the following:
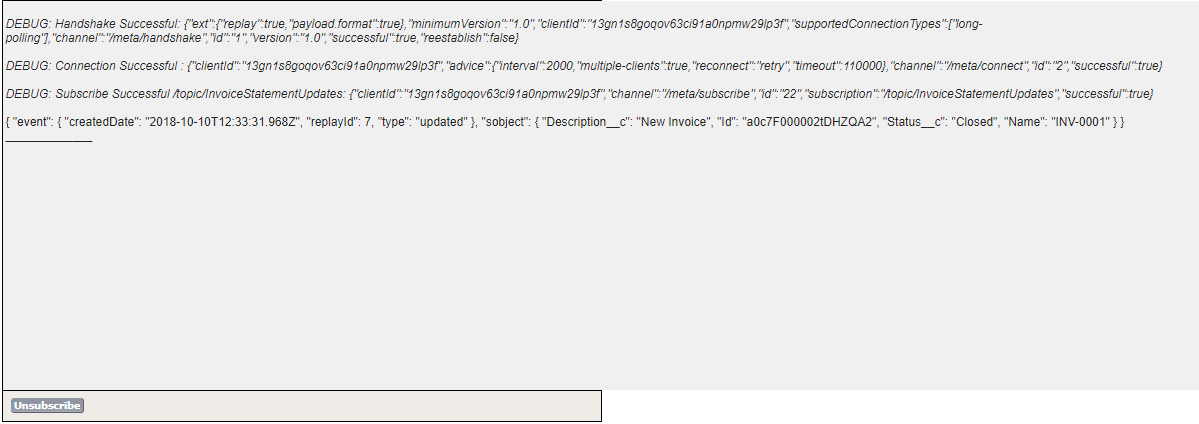
- Modify “Status” of InvoiceStatement in a different browser tab.
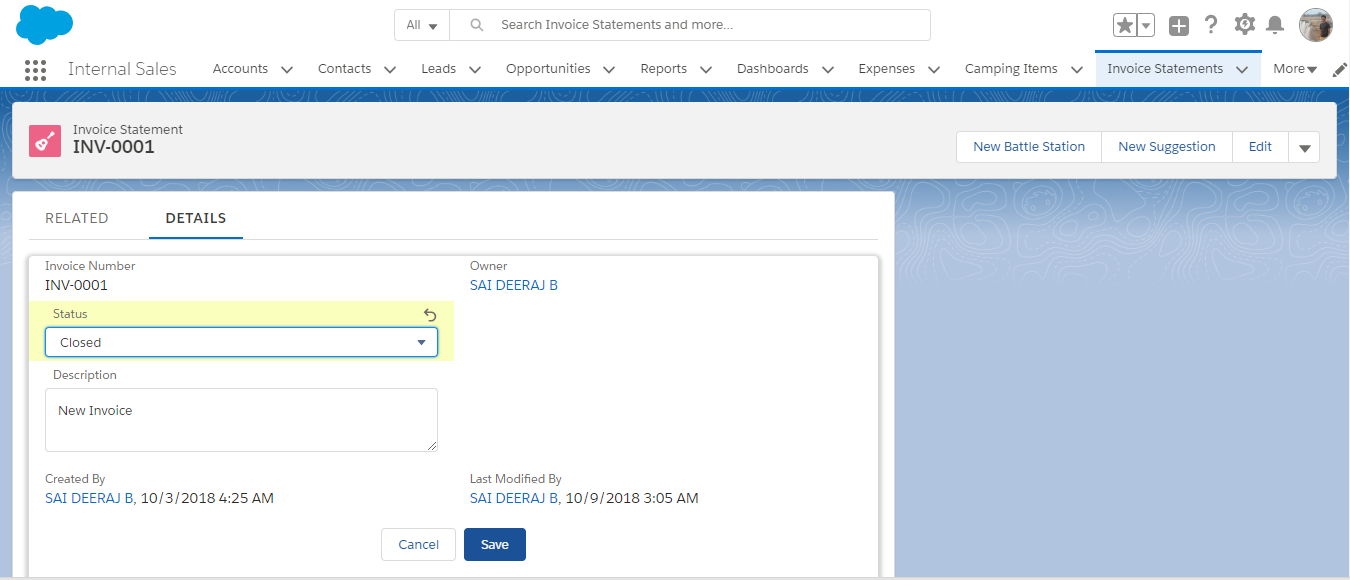 The page displays some debug messages and event notifications. The output resembles the following:
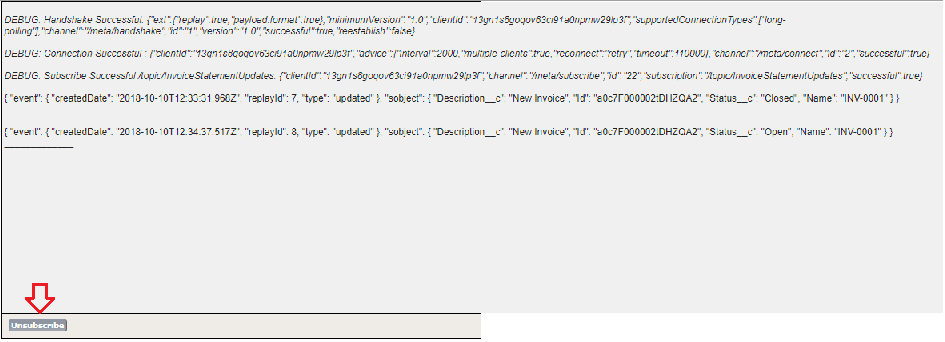
- The debug messages contain information about the subscription status. The first event notification shows the notification data when an invoice statement is created. The second notification shows the notification data when an invoice statement is updated.
Click Unsubscribe to unsubscribe from the channel and stop receiving notifications.


1 thought on “Introduction To Salesforce Streaming API”
Great insights, thanks for sharing!
Salesforce Implementation