Salesforce Upcoming release WINTER’17 is just a week away. I had the opportunity to gain access to the Pre-release org ( Not a magic though you can also get one here <a href=”https://www.salesforce.com/form/contact/contactme/?d=7010M000002McDl” target=”_blank” rel=”noopener”>Signup form for WINTER’17 Pre-Release Org</a>) . Let’s take a look at each of these features .
<h3>Improved Navigation Menu</h3>
This is the most awaited , discussed and requested feature (UI wise) of this release. The navigation menu that previously displayed on the side of Lightning Experience becomes a horizontal navigation bar at the top of the page, just like in Salesforce Classic, letting your users:
<ul class=”ul”>
<li class=”li”>Find what they need <strong>using item names</strong> instead of icons for easy recognition</li>
<li class=”li”>Use a consistent and familiar navigation experience .</li>
</ul>
<h3>Field Level Help in LEX</h3>
One of the strengths of Salesforce lies in detailing and making it easier for Sales Reps as much as possible . <span id=”shortdesc” class=”ph”>Salesforce Classic users have always appreciated the field-level help you create for custom fields. Now</span> this feature is available in Lightning Experience, Salesforce Classic, and all versions of the Salesforce1 mobile app.
View help by hovering over the info icon next to a field. And what’s more , Field-level help in Lightning Experience is supported across all browsers.
<h3>Create Multiple Records quickly in LIGHTNING too</h3>
<span id=”shortdesc” class=”ph”>After your users create, edit, or clone a record in Lightning Experience, they can create another record using the Save & New button. The Save & New button lets users create records repeatedly without leaving their spot in the app</span>.The button is available in the same locations as in Salesforce Classic, which include most Create, Edit, and Clone pages.<strong> </strong>
<h3>The Salesforce1 Actions Category in the Page Layout Editor Has a New Name</h3>
<div class=”body”>
<p class=”shortdesc”><span id=”shortdesc” class=”ph”>With the introduction of Lightning component actions, the name of the Salesforce1 Actions category in the enhanced page layout editor doesn’t reflect all the actions that you can find there. You can use the actions in that category in both Salesforce1 and Lightning Experience. So it was renamed it to <strong class=”scenario-text”>Salesforce1 & Lightning Actions</strong>.</span> This feature is available in both Lightning Experience and Salesforce Classic.</p>
</div>
<h3>Record Details Tab never forgets in Lightning Experience</h3>
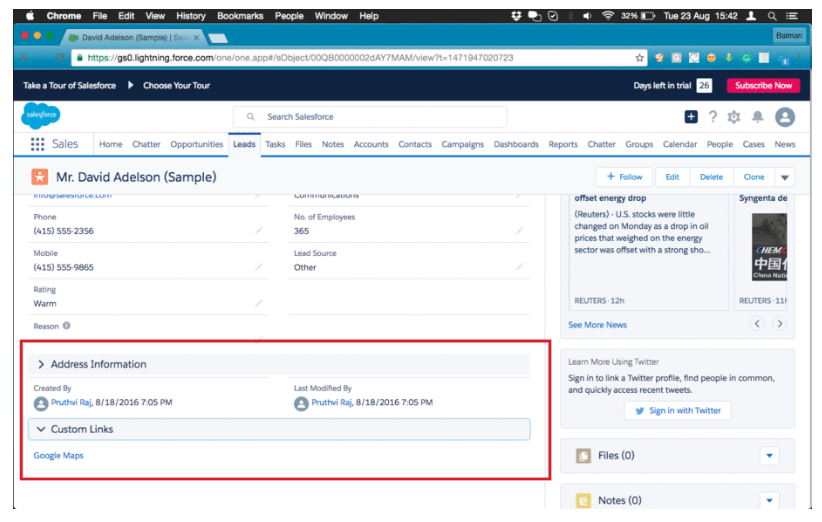
<span id=”shortdesc” class=”ph”>When the users expand or collapse a section in record details in Lightning Experience, the section stays that way even after visiting other areas in Salesforce. This change helps users scroll through a record faster, showing only the information they care about.</span> This feature is available in Lightning Experience only.
For example, in Lead details, a user collapses the <strong class=”scenario-text”>Address Information</strong> section and expands the <strong class=”scenario-text”>Custom Links</strong> section. The next time the user views a lead’s details with the same layout, those sections remain collapsed and expanded, respectively.
 <h3>Clearer,More Actionable popups for Record</h3>
<span id=”shortdesc” class=”ph”>Confirmation messages that appear after your users create, edit, delete, or clone a record successfully from a related list in Lightning Experience and Salesforce1 have changed. The messages include the record name for more context.</span> This feature is available in Lightning Experience and all versions of the Salesforce1 mobile app.
Also, after your users create a record from a related list in Lightning Experience (not Salesforce1), the popup message includes a link to the record for easy navigation.
<h3>Launch a Lightning Component from an Action</h3>
<div class=”body”>
<div class=”shortdesc”><span id=”shortdesc” class=”ph”>Lightning component actions are custom actions that invoke a Lightning component. Because they support Apex and JavaScript, Lightning component actions provide a secure way to build client-side custom functionality.</span> This feature is available in Lightning Experience and all versions of the Salesforce1 mobile app.</div>
<div class=”shortdesc”></div>
<p class=”shortdesc”>To create a Lightning component action, select <strong class=”scenario-text”>Lightning Component</strong> from the Action Type drop-down list when you create either a global or object-specific action.</p>
<p class=”p”>Lightning component actions can’t call just any Lightning component in your org. For a component to work as a Lightning component action, it has to be configured specifically for that purpose and implement either the <strong class=”scenario-text”>force:LightningQuickAction </strong>or <strong class=”scenario-text”>force:LightningQuickActionWithoutHeader</strong> interfaces. You can find out more about configuring custom components in the <a class=”xref” title=”HTML” href=”https://developer.salesforce.com/docs/atlas.en-us.204.0.lightning.meta/lightning/” target=”_blank” rel=”noopener”>Lightning Components Developer Guide</a>.</p>
<p class=”p”>You can add Lightning component actions to an object’s page layout using the page layout editor. If you have Lightning component actions in your org, you can find them in the Salesforce1 & Lightning Actions category in the page layout editor’s palette.</p>
</div>
<h3>Displays Record Type Name if it exists</h3>
<span id=”shortdesc” class=”ph”>When your users create a record in Lightning Experience, the Create dialog title includes the record type if it exists. For example, you have two record types, <strong class=”scenario-text”>Hot</strong> and <strong class=”scenario-text”>Cold</strong>, assigned to the Lead object to indicate the prospect’s status. When your users create a Lead with the Hot record type, “Hot” appears in the title of the Create dialog to provide more context.</span> This feature is available in Lightning Experience only.
<h3>More Accessible tabs in App Launcher</h3>
Prior to Winter 17 Release when clicked on the little “<strong class=”scenario-text”>Horizontal 3 lines</strong>” icon a page with all the apps and<strong class=”scenario-text”> “Other Items” </strong>will be displayed . When clicked on Other Items you will be navigated to the list of tabs available . From Winter 17 Release you need not go through 2 screens instead, tabs will also be displayed on the same screen as shown in the slideshow below.
<h3>Reply to and Forward Emails Right from Salesforce</h3>
<div class=”body”>
<p class=”shortdesc”><span id=”shortdesc” class=”ph”>After reading an email, you often want to respond right away. Prior to Winter 17 you cannot .Now you can. Just click <strong class=”scenario-text”>Reply</strong>, <strong class=”scenario-text”>Reply All</strong>, or <strong class=”scenario-text”>Forward</strong> from the email detail page or activity timeline. It’s as easy as…sending an email. These options are only available to organizations using Enhanced Email, which is automatically enabled for most customers.</span> This feature is available in Lightning Experience only.</p>
<div class=”shortdesc”></div>
</div>
<div class=”shortdesc”>
</div>
<div class=”shortdesc”></div>
<div class=”shortdesc”>
<div id=”main”>
<div class=”container”>
<div class=”row”>
<div class=”col-xs-12″>
<div id=”sfdc-topic”>
<div class=”body”>
<div class=”p”>
Here’s a few things to know about how replying and forwarding works.
<ul class=”ul”>
<li class=”li”>You can’t forward email attachments sent in Salesforce Classic in Lightning Experience.</li>
<li class=”li”>When forwarding emails, the most recent version of the file is attached rather than the version sent in the original email.</li>
</ul>
<h3>Use Salesforce Files as Icons in Custom Lightning Apps</h3>
<div class=”body”>
<p class=”shortdesc”><span id=”shortdesc” class=”ph”>When packaging custom apps in Lightning Experience, the app icon is now stored as a Salesforce File. Storing your custom app icons as Salesforce Files lets you take advantage of all the Files platform features such as versions, previews, and sharing rules. Salesforce Files used in this way are called <strong class=”scenario-text”>asset files</strong>.</span> This feature is available in Lightning Experience only.</p>
<p class=”p”>When packaging an app, upload any <span class=”ph”>.png</span>, <span class=”ph”>.jpg</span>, <span class=”ph”>.bmp</span>, or static <span class=”ph”>.gif</span> file up to 5 MB. Anyone with access to manage the asset file can view it in Files Home.</p>
<h3>Get the Complete Picture with Account Logos (Generally Available)</h3>
<div class=”body”>
<div class=”shortdesc”><span id=”shortdesc” class=”ph”>Your accounts never looked so good! Now that logos are automatically added to account records, sales reps can visualize business like never before.</span> This feature is available in Lightning Experience and all versions of the Salesforce1 mobile app.</div>
<p class=”p”>When available, logos automatically appear on US-based accounts. Logos also appear with the company suggestions that reps see when creating accounts. If you use Social Accounts, logos that reps added manually from social networks might be replaced with a fresher, more up-to-date logo.</p>
</div>
</div>
</div>
</div>
<div id=”sfdc:seealso” class=”related-links”>
<h3>Relating a Contact to Multiple Accounts Gets Even Better</h3>
<div class=”body”>
<p class=”shortdesc”><span id=”shortdesc” class=”ph”>Contacts to Multiple Accounts, <strong class=”scenario-text”>the highly celebrated feature</strong> that lets your sales reps easily manage the relationships between people and businesses, continues its climb toward the top. New functionality makes adopting this many-to-many data model the obvious choice.</span> This feature is available in Lightning Experience, Salesforce Classic, and all versions of the Salesforce1 mobile app.</p>
<div class=”shortdesc”></div>
<div class=”shortdesc”>
How Salesforce has improved Contacts to Multiple Accounts? Let’s count the ways.
<ul class=”ul”>
<li class=”li”>You can indirectly relate person accounts to business accounts. From Setup in Salesforce Classic, add the Related Accounts related list to the person account page layouts that your reps use.</li>
<li class=”li”>Triggers are now supported for the Account Contact Relationship object. For example, create a trigger so that when a relationship is marked as inactive, the end date is populated with the current date.</li>
<li class=”li”>Validation rules are now supported for the Account Contact Relationship object. For example, create a validation rule so that when a relationship is saved, the Start Date changes to read-only.</li>
<li class=”li”>Account-contact relationships can now be viewed, created, and edited from Community Builder-based templates.</li>
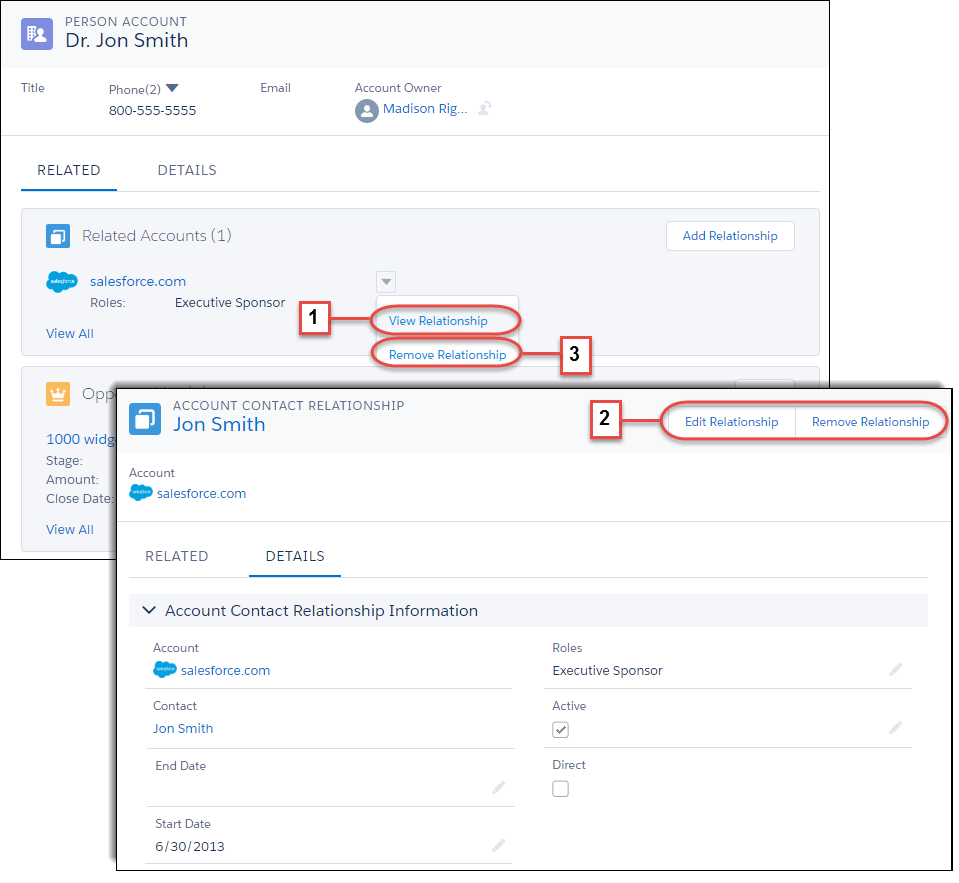
<li class=”li”>The new View Relationship action (1) takes sales reps to a detail page of the account contact relationship. From there reps can edit or remove indirect relationships (2) or edit direct relationships. Of course, you can still remove indirect relationships from the related list on the account or contact record (3).</li>
</ul>
</div>
</div>
</div>
</div>
</div>
</div>
</div>
</div>
<div id=”footer”>
 <h3>News Has Arrived for Contacts</h3>
<div class=”body”>
<div class=”shortdesc”><span id=”shortdesc” class=”ph”>Have the most prepared sales reps in the world by giving them access to the latest, most timely news about the people they’re trying to sell to.</span> This feature is available in Lightning Experience and all versions of the Salesforce1 mobile app.</div>
<div class=”shortdesc”>The news on contact records works similar to other objects. News items are selected based on the contact’s related account, its executives, and its industry, and come from US-based sources.</div>
<div class=”shortdesc”>
</div>
</div>
</div>
</div>
<div class=”shortdesc”>
<h3>Take Ownership of Multiple Leads at Once</h3>
<div class=”body”>
<div class=”shortdesc”><span id=”shortdesc” class=”ph”>If you use queues to prioritize and assign leads among team members, your reps can now take ownership of multiple leads from the queue at once.</span> This feature is available in both Lightning Experience and Salesforce Classic.</div>
<p class=”p”>From the queue list view, your reps can select all the leads their hearts desire (up to 200). When they click <strong class=”scenario-text”>Accept</strong>, they’re committed and those leads become theirs. The <span class=”keyword”>Lead Owner</span> field is changed to the user who accepted the lead. With fewer clicks to make, your reps can get cracking on those leads.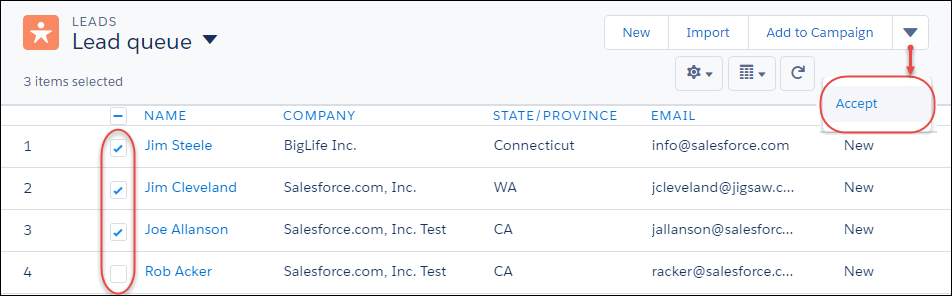
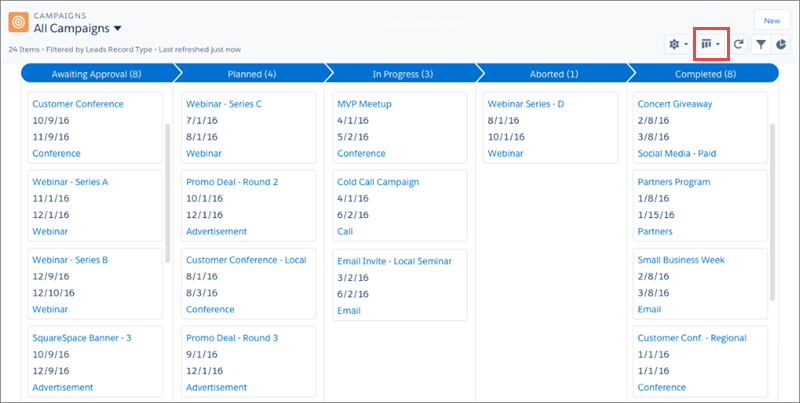
<h3>Kanban: Track and Manage Leads, Contracts, and Campaigns Visually</h3>
<div class=”body”>
<p class=”shortdesc”><span id=”shortdesc” class=”ph”>This is one of my favorite features . Sales reps can more effectively monitor their progress with leads, contracts, and campaigns using the same Kanban-style visual layout they use for their opportunities.</span> This feature is available in Lightning Experience only.</p>
</div>
<div class=”shortdesc”></div>
<p class=”shortdesc”>To access the Kanban view, <strong class=”scenario-text”>select Kanban from the Display menu</strong>. If the list view you’re viewing includes multiple record types, filter for a single record type to load your records in the Kanban view.</p>
 </div>
<div class=”shortdesc”>
<h3>Manage Global Picklists in Lightning Experience Setup</h3>
<div class=”shortdesc”><span id=”shortdesc” class=”ph”>Now you can create and manage your global picklist value sets from either user interface. No more switching back and forth to manage all of your picklists in Setup. This feature is available in both Lightning Experience and Salesforce Classic.</span></div>
</div>
<div class=”shortdesc”>
<h3>Filter Reports by Relative Dates in Lightning Experience</h3>
<div class=”body”>
<div class=”shortdesc”><span id=”shortdesc” class=”ph”>Want to see all the opportunities you’ve closed this year? Instead of filtering by calendar dates, such as Close Date greater than Jan 1, 2016, filter your report by a relative date: Close Date equals THIS YEAR. In addition to being easy to understand, you don’t have to remember to update your report filter once 2017 rolls around.</span></div>
</div>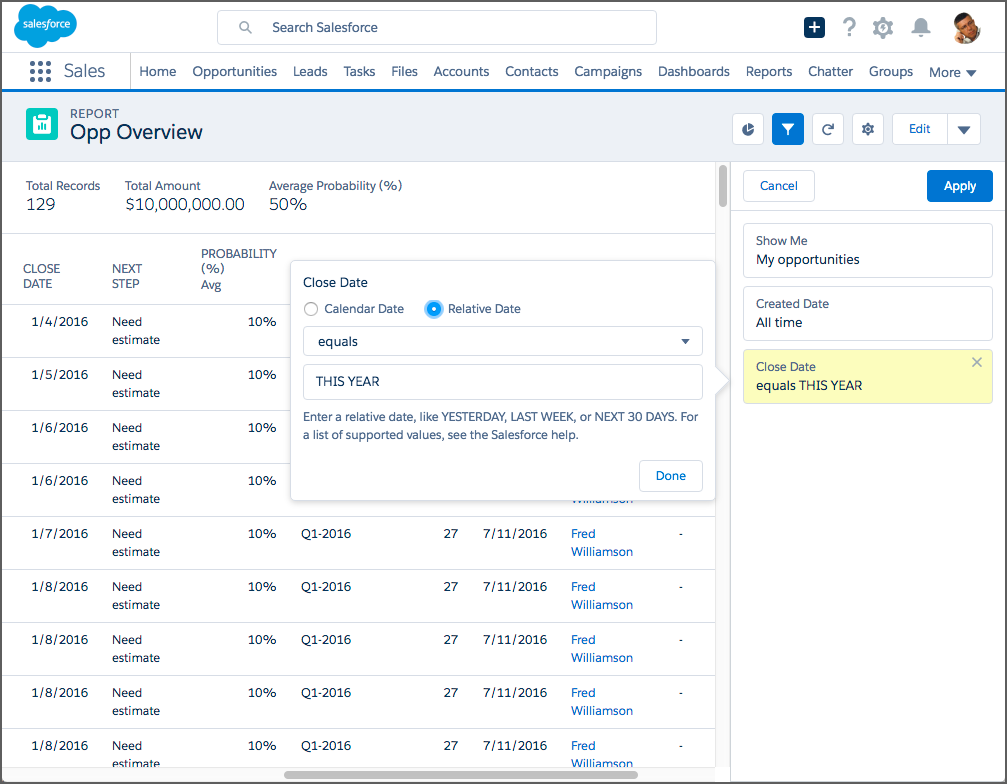 <div class=”body”>
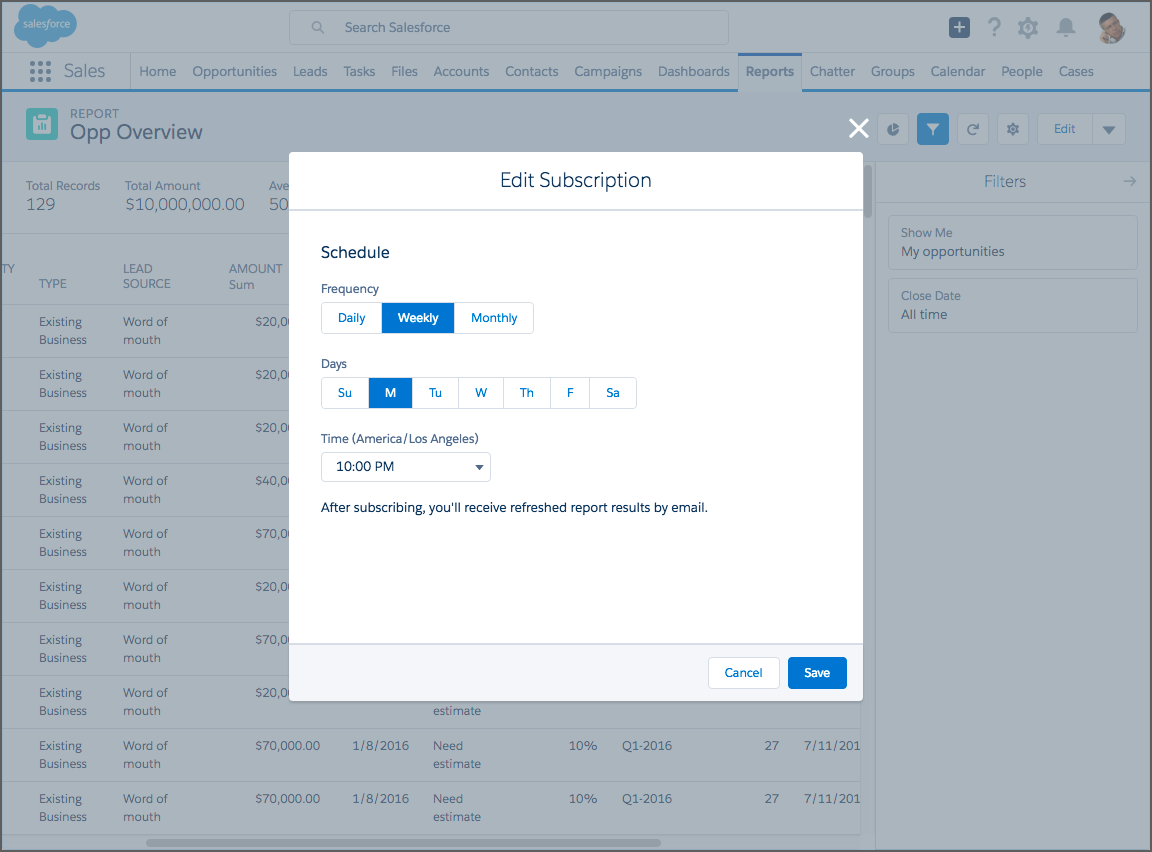
Subscribe to Reports in Lightning Experience
<div class=”body”>
<p class=”shortdesc”><span id=”shortdesc” class=”ph”>You know that report you check when you arrive in the office every Monday morning? Why not have it emailed to you every Monday at 8:00 AM instead? Subscribe to up to five reports and receive refreshed report results by email on a schedule you set: <strong class=”scenario-text”>daily, weekly, or monthly.</strong></span></p>
<div class=”p”>
<div class=”data”>
<table class=”permTable” border=”0″ summary=”Permissions” width=”100%”>
<thead class=”thead” align=”left”>
<tr>
<th id=”d87057e52″ class=”permTableHeader” colspan=”2″>
<h6>User Permissions Needed</h6>
</th>
</tr>
</thead>
<tbody class=”tbody”>
<tr>
<td class=”permRowLeft” headers=”d87057e52″>To Subscribe to reports in Lightning Experience:</td>
<td class=”permRowRight” headers=”d87057e52″>“Subscribe to Reports”</td>
</tr>
</tbody>
</table>
</div>
To start a report subscription, open a report and click <strong class=”scenario-text”>Subscribe</strong>. Specify when to receive the report, and then go about your business. When you need the report data, it’s waiting for you in your inbox.
 <div class=”p”>
<h3>Chart Improvements in Lightning Experience: Table, Gauge, Bar, Scatter, Line, and Combo Charts</h3>
<div class=”shortdesc”><span id=”shortdesc” class=”ph”>If a picture is worth a thousand words, is a chart worth a thousand insights? With our latest round of Lightning Experience chart enhancements, your charts are worth more insights than ever!</span></div>
<dl class=”dl”>
<dt class=”dt”>
<h4>Add Tables to Dashboards in Lightning Experience</h4>
&</dt>
<dd class=”dd”>From the Lightning Experience dashboard editor, you can now add table components and sort columns from the component editor. Tables in Lightning Experience dashboards show conditional highlighting and Chatter photos, but to configure conditional highlighting and Chatter photos, switch to Salesforce Classic.</dd>
<dd class=”dd”>
<div class=”fig”></div>
<div class=”fig”><img class=”image” src=”https://releasenotes.docs.salesforce.com/en-us/winter17/release-notes/release_notes/images/rd_charts_table_sort_highlight_photos.png” alt=”Table” /></div>
<div class=”fig”></div></dd>
<dt class=”dt”>
<h4>Gauge Charts Display Percentages</h4>
&</dt>
<dd class=”dd”>Gauge charts added to Lightning Experience dashboards now show percentages by default. Gauge charts configured to show percentages in Salesforce Classic now also show the percentage in Lightning Experience.</dd>
<dd class=”dd”></dd>
<dd class=”dd”>
<div class=”fig”><img class=”image” src=”https://releasenotes.docs.salesforce.com/en-us/winter17/release-notes/release_notes/images/rd_charts_gauge_percent.png” alt=”Gauge” /></div>
<div class=”fig”></div></dd>
<dt class=”dt”>
<h4>Stack Bar Charts to 100%</h4>
&</dt>
<dd class=”dd”>Stacked bar charts are wonderful for comparing absolute values side by side. Stacking a bar chart to 100% enables you to compare relative values side by side. For example, instead of comparing opportunities by stage and <em class=”ph”>total</em> opportunity amount, stacking lets you compare the <em class=”ph”>proportion</em> of opportunity amounts by stage.
<p class=”p”>To stack a bar chart to 100%, your report must have at least two groupings, and one of the groupings must be a number.</p>
<div class=”fig”><img class=”image” src=”https://releasenotes.docs.salesforce.com/en-us/winter17/release-notes/release_notes/images/rd_charts_stacked_to_100.png” alt=”Stacked” /></div>
<div class=”fig”></div></dd>
<dt class=”dt”>
<h4>Plot Report Data on a Scatter Chart</h4>
&</dt>
<dd class=”dd”>Scatter charts make it easy to see how opportunity age affects opportunity amount.
<p class=”p”>To plot report data on a scatter chart, your report must have at least two summarized fields.</p>
<div class=”fig”><img class=”image” src=”https://releasenotes.docs.salesforce.com/en-us/winter17/release-notes/release_notes/images/rd_charts_scatter.png” alt=”Scatter” /></div>
<div class=”fig”></div></dd>
<dt class=”dt”>
<h4>Graph Report Data in a Cumulative Line Chart</h4>
&</dt>
<dd class=”dd”>Now you can make your line charts on reports cumulative and really highlight revenue growth over time.</dd>
<dd class=”dd”>
<div class=”fig”></div>
<div class=”fig”><img class=”image” src=”https://releasenotes.docs.salesforce.com/en-us/winter17/release-notes/release_notes/images/rd_charts_cumulative_line_reports.png” alt=”Cumulative” /></div>
<div class=”fig”></div></dd>
<dt class=”dt”>
<h4>View Combination Charts on Reports in Lightning Experience</h4>
&</dt>
<dd class=”dd”>Previously, combination charts added to reports in Salesforce Classic appeared as bar or donut charts in Lightning Experience. Now, combination charts that you add to your report in Salesforce Classic appear above your report in Lightning Experience.</dd>
<dd class=”dd”>
<div class=”fig”></div>
<div class=”fig”><img class=”image” src=”https://releasenotes.docs.salesforce.com/en-us/winter17/release-notes/release_notes/images/rd_charts_combo_report.png” alt=”Combo” /></div></dd>
</dl>
<div class=”fig”>
<h6>And that’s not it there are many more powerful features in Winter’17 Release notes. This post was just a sneak peek, for a complete list of Winter’17 Release Notes please navigate to <a href=”https://releasenotes.docs.salesforce.com/en-us/winter17/release-notes/rn_lex_feature_list.htm” target=”_blank” rel=”noopener”>Salesforce Release Notes section.</a> You will find even more fascinating features related to Lightning Development , Outlook , Google Integration , Service Cloud , Chatter etc.,</h6>
</div>
</div>
</div>
<div class=”fig”></div>
<div class=”fig”>
<h6>Source : <a href=”https://releasenotes.docs.salesforce.com/en-us/winter17/release-notes/rn_lex_feature_list.htm” target=”_blank” rel=”noopener”>Salesforce Release Notes</a></h6>
</div>
</div>
</div>
</div>
<h2 class=”helpHead1″></h2>
<div class=”body”></div>
&