The Below content focuses mainly on the working of Single-Sign-On and understanding SAML role in it, rather than describing it how to configure in Salesforce.
What is SSO?
Single sign-on (SSO) is an authentication process that allows a user to access multiple applications with one set of login credentials.
Why SSO?
SSO solves the biggest issue of managing the increasing number of users across the ecosystem of applications and services.
In our daily routine, we come across many web services which require registration before you can access their services, so with the SSO, there will be only one single credential for the user which can be used across multiple web services.

Benefits of using single sign-on include:
- Mitigate risk for access to 3rd-party sites (user passwords not stored or managed externally)
- Reduce Password fatigue from the different username and password combinations
- Reduce time spent re-entering passwords for the same identity
- Reduce IT costs due to a lower number of IT help desk calls about passwords
In the current discussion, we are using SAML(Security Assertion Markup Language) protocol for SSO. it is Open standard for exchanging Authentication and Authorization between Systems. SAML based authentication is supported by all editions of Salesforce.
How SAML SSO Works?
In simple, the process flow usually involves the trust establishment and authentication flow stages. The trust establishment occurs between Identity Provider and Service Provider, Service provider trusts on Identity Provider.
Basic terminology definitions before diving in
Identity Provider:
An IDP is a trusted system that authenticates users for the benefit of other, unaffiliated websites or digital resources.
When you log in to a new retail website by clicking “Sign in with Google” or “Sign in with Facebook,” that’s an example of Google or Facebook acting as a trusted identity provider (IdP), and authenticating you on behalf of that online store.
Service Provider:
A Service Provider (SP) is an entity that provides Web Services. Examples of Service Providers include Application Service Providers (ASP), Storage Service Providers (SSP), and Internet Service Providers (ISP). It relies on a trusted Identity Provider (IdP). It is an actual web service that is used by an end user.
SSO Flow:
Let us take an example of a popular web service login like Spotify. The direct way to access the services of Spotify is to register yourself as a user in Spotify or the other way is to use the big website’s data like Facebook and log in. There is a very high chance that the user may exist in the Facebook database, that is the reason most of the web services use Facebook. When you click on sign up with facebook it redirects you to facebooks login page, where you will enter facebooks credentials and then it verifies them against its database and logs you in. once you are logged in facebook redirects you to a third-party website with an Encoded SAML Assertion it has made. This assertion basically means, facebooks way of telling “yes this person holds a valid account with me”. This SAML assertion is finally consumed by Spotify and allows user access to its web services. By this you would have understood, what is IDP and SP in this example, If not go through it again.
Let us go through how to configure service provider and identity provider
Configuring SSO in Salesforce:
Steps to configure SSO in Salesforce
- Gather information from your identity provider.
- Set up single sign-on in Service Provider.
- Provide information to your identity provider.
- Setting Up Users
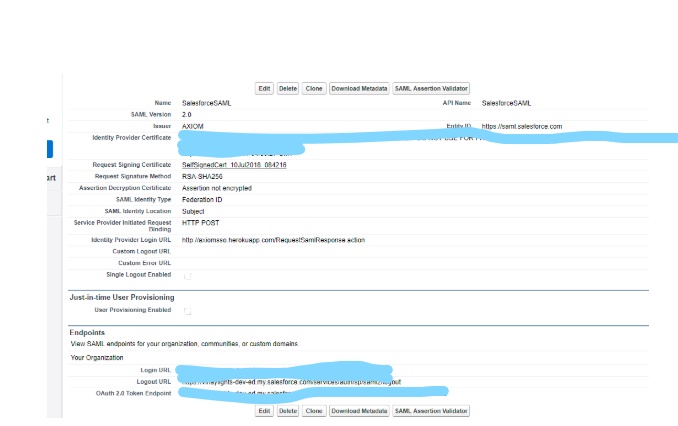
Gather information from your identity provider
Before you can configure Salesforce for Single-Sign-On, you must receive information from your identity provider. This information must be used on the single sign-on page.
- SAML Version
- Entity ID
- Identity Provider Certificate(This should be downloaded to the local system and should be used while configuring service provider)
Or the simplest way to get all these information is downloading Metadata of configuration from Identity Provider.
Set Up single sign-on
- In Salesforce, from Setup, enter Single Sign-On Settings in the Quick Find box, then select Single Sign-On Settings, and click Edit.
- Select SAML Enabled. You must enable SAML to view the SAML single sign-on settings.
- Specify the SAML version used by your identity provider.
- Click Save.
- In SAML Single Sign-On Settings, click the appropriate button to create a configuration, as follows.
- New – Specify all settings manually.
- New from Metadata File – Import SAML 2.0 settings from an XML file from your identity provider. This option reads the XML file and will use it to complete as many of the settings as possible.
Note: If your XML file contains information for more than one configuration, the first configuration that occurs in the XML file will be used.
- New from Metadata URL – Import SAML 2.0 settings from a public URL. This option reads the XML file at a public URL and uses it to complete as many of the settings as possible. The URL must be added to Remote Site Settings to access it from your Salesforce Org.
Configuring manually
- NAME – any name will work
- API Name – any valid name
- Issuer – Any name. You must remember this as your IDP must pass the same name while sending the request or else you can download metadata of SSO once after configuring it. It contains the information about Issuer.
- Identity Provider Certificate – Upload certificate here, that is downloaded previously from IDP. when SP receives a message from IDP, it uses this certificate defined in IDP’s metadata in order to verify whether the message was created by the IDP and wasn’t tampered with during transport.
- Entity Id – “https://saml.salesforce.com”
- SAML Identity Type – Assertion contains the Federation ID from the User object
- SAML Identity Location – Identity is in the NameIdentifier element of the Subject statement. Set this to the element where your identifier is located.
- Identity Provider Login URL –The URL of the IDP and this URL must be publicly accessible on the Internet
- Service Provider Initiated Request Binding – HTTP POST(This indicates that once after SAML Assertion is formed by IDP ,it does a HTTP POST of SAML Assertion to SP)
Once Service Provider is configured, you can download the metadata from the settings you have configured and sent it to Identity Provider. This makes sure that both service provider and identity provider are configured accordingly.
Setting Up Users:
Once SAML is enabled in SP, One new field is created on user record “Federation ID”. This field can be used as a username to validated against IDP. Copy one of Username from Identity Provider instance to “Federation Id” field of the related user in Service Provider. In simple, The above statements convey that there should be a user in Service Provider for the respective user in IDP, but the password that end user uses remains same and it will be stored in IDP. Even though if there is no related user, Service Provider will create it. In this scenario, we are using Federated type of Authentication. The other is Delegated Authentication.
If we consider the above Spotify example, during SSO logging process if there is already a user in the Spotify database for the respective user in Facebook, he will get logged in to Spotify and if there is no respective user on the Spotify database related to the Facebook user, then a user will be created in Spotify and he will get logged in.
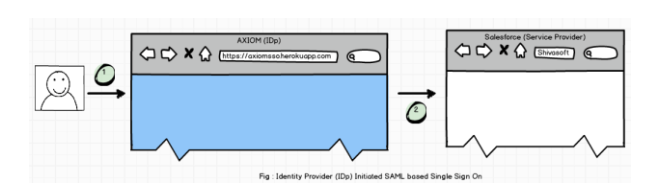
SSO Flow for the above configuration in Salesforce:
There are two types of SSO initiation:
- IDP initiated SSO
- SP initiated SSO
In IDP Initiated SSO, User Directly logs into the Identity provider and IDP redirects the user to proper Salesforce Instance with SAML assertion in the request (Service Provider). If SAML assertion is valid then Salesforce validates that user successfully.
For SP-Initiated SSO, we need to inform Salesforce that Instead of Standard Login Page, Users have to use Single Sign-on Page.
Navigate to “Domain Management | My Domain | Login Page Branding” and click to Edit
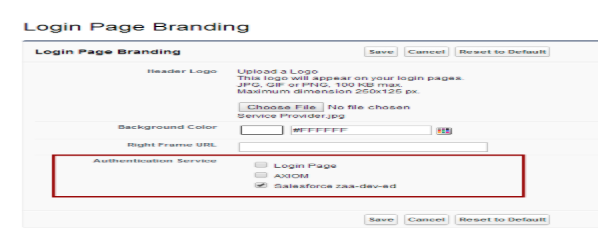
As you can see in above image, we will get the option for all SSO and Login page also. If we don’t disable Login Page, Users can log in by their standard Salesforce username and password and SSO will not be called. So, uncheck everything except required SSO settings and Save it.
Now, navigate to the Login page of Service Provider and try to enter username and password of the Identity Provider. You should be redirected to Service provider after authentication.
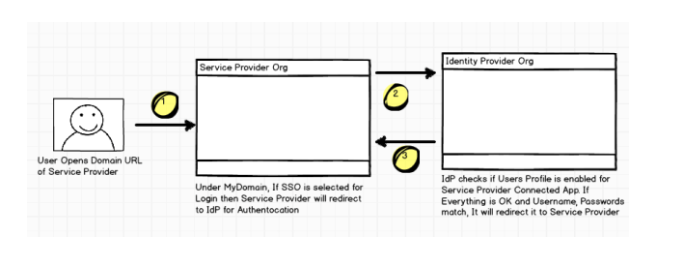
In both ways, you will enter IDP credentials. Upon successful authentication, IDP responds back with an SSO re-direct (HTTP POST binding) which includes an HTML FORM with HTTP POST Action and contains a base-64 encoded SAML assertion XML. It requires the user to submit the HTML page by clicking the Login to Salesforce button, which results in submitting an HTTP POST request to the Salesforce login URL.
Salesforce validates message integrity using the embedded signature in the SAML assertion XML against the IDP certificate, which is already uploaded during the SSO setup process. Upon successful signature validation, it processes the SAML assertion statement, extracts and validates the federation ID, and finally redirects to the page originally requested.
Trouble Shooting
While testing the SSO login, you can monitor the login history at Force.com from a separate login as the Salesforce administrator. Open login history page at Force.com site, which can help you troubleshoot the SSO login failures.
Conclusion
Organizations that have fewer Salesforce users may not require a single sign-on solution as they can continue to use the Salesforce standard login process. However, organizations with a large number of Salesforce users can leverage this solution by implementing the single sign-on infrastructure for all their internal applications as well as cloud-based and external applications (for example, Force.com), which support Federated Identity Management using an external SSO identity provider.