Hello, Trailblazers and Salesforce Enthusiasts!! This blog is about Configuring and deploying Live Agent in Salesforce. You look excited enough!! Let’s get started!!
Live Agent in Salesforce: Introduction
Live agent lets you create and customize your own chat window. So that all your web-visitors/Customers can get help 24×7 with the help of live agent chat.
It helps service organizations connect with customers or website visitors in real time through a Web-based, text-only live chat. You can customize Live Agent to create a personalized chat experience for your customer service agents and the customers they serve using custom code.
Your Service reps can reach out to customers, and respond to their queries using the live chat agent.
Live Agent Implementation:
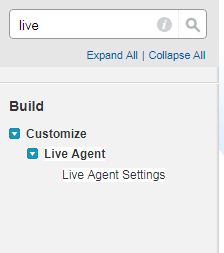
1.Enabling Live Agent:
In order to configure the live agent in your Salesforce Org. Live Agent permission must be enabled.
From the quick find, type Live agent Settings click on enable live agent and then click on save.
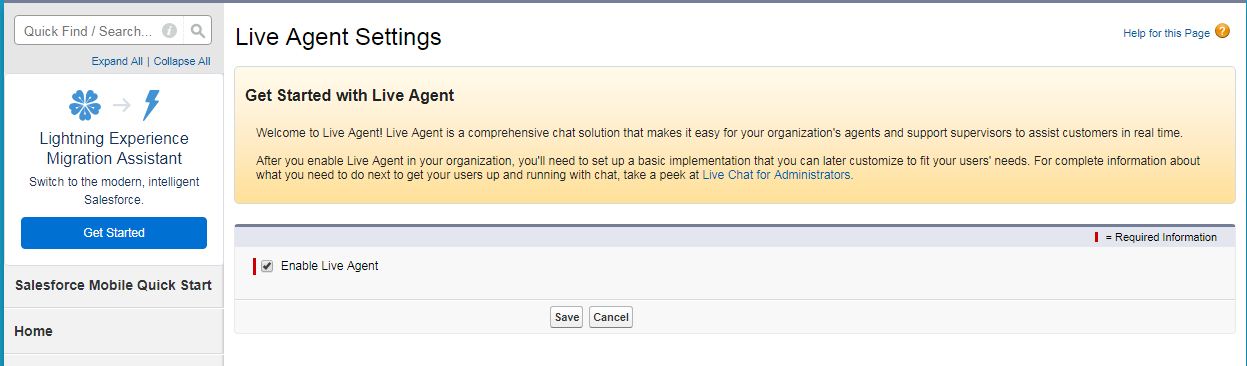
Once you enable the Live Agent below objects will auto-created in your Org.
- Live Chat Visitors
- Live Chat Transcripts
- Live Chat Transcript Events
- Live Agent Sessions
- Live Agent Supervisor
- Live Agent
- Quick Text
2. Create Live Agent User:
From Setup in Salesforce, enter Users in the quick find box and then click on users. Click edit next to a Users name, and then select Live Agent User.
Finally, click Save.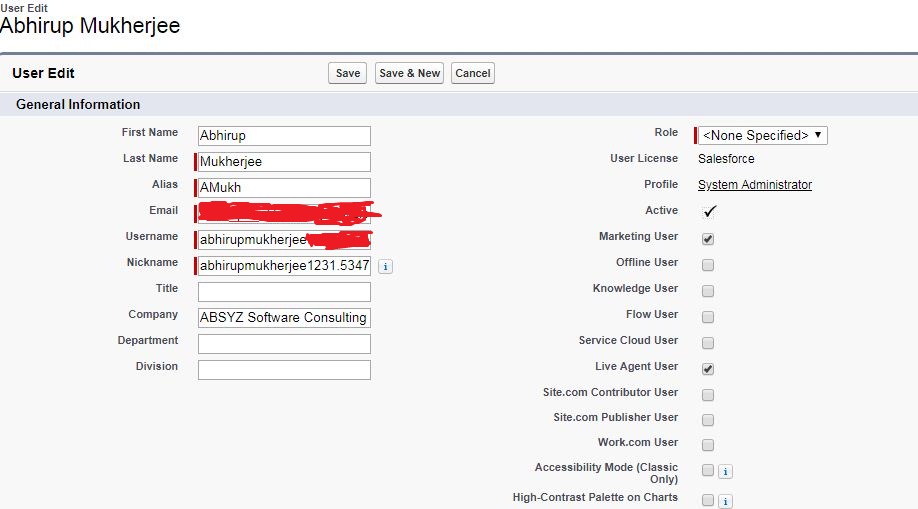
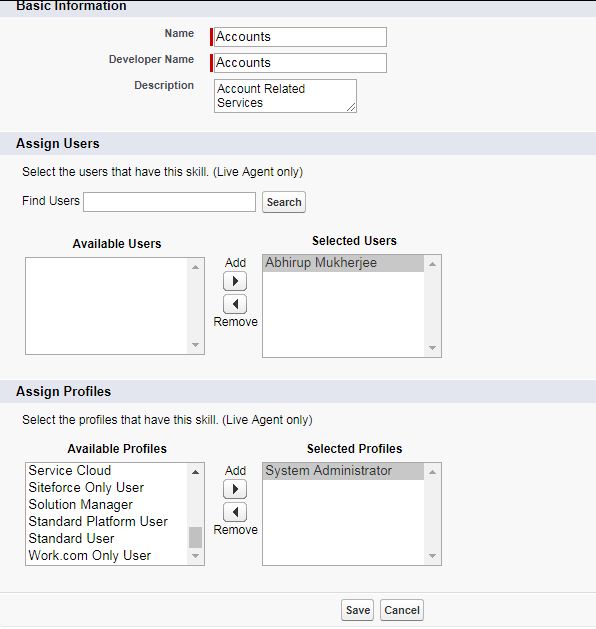
Once you have created and assigned users, now you need to create and assign live agent skills.
3. Create and Assign Live Agent Skills:
From quick find in setup, enter skills and click new. Assign a user for your live agent, from the list of available users in your Org. Assign the profile to the user you want to associate the skill with, and select the profile which has available permissions for the live agent.
4. Live Agent Configuration Settings:
Live Agent configuration settings control the functionality that’s available to agents and their supervisors while agents chat with customers.
From setup, enter Live Agent Configurations and then click New.
Choose the settings for your live agent and then click on Save.
Before configuring your live agent, create chat buttons for your live chat agent and relate the button via lookup in the Default Button Filter.

5. Creating a Chat Button:
Quick find→ Chat Buttons → New
Choose the type as “button” and then configure the button accordingly.
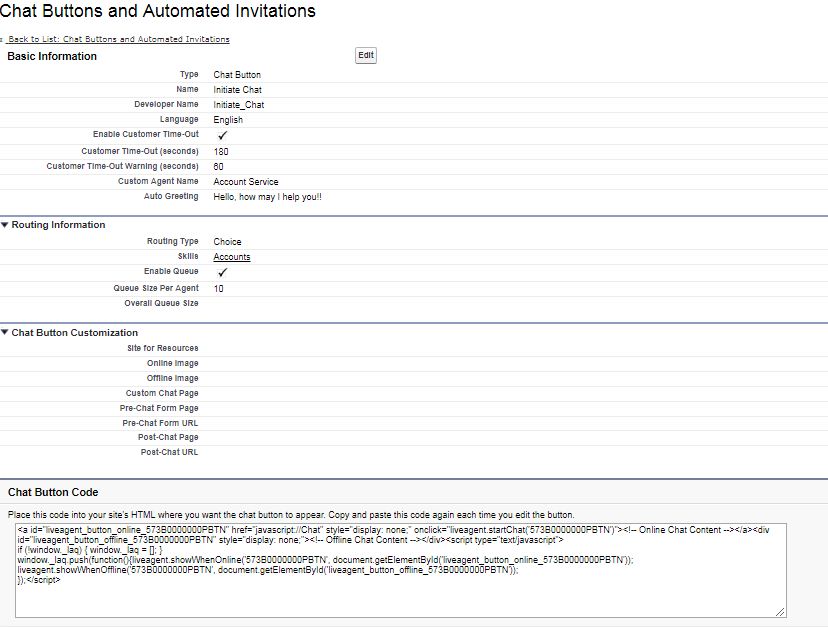
Once, you click save the HTML Code for the button is auto-generated. You can copy the code, and use it in your website HTML.
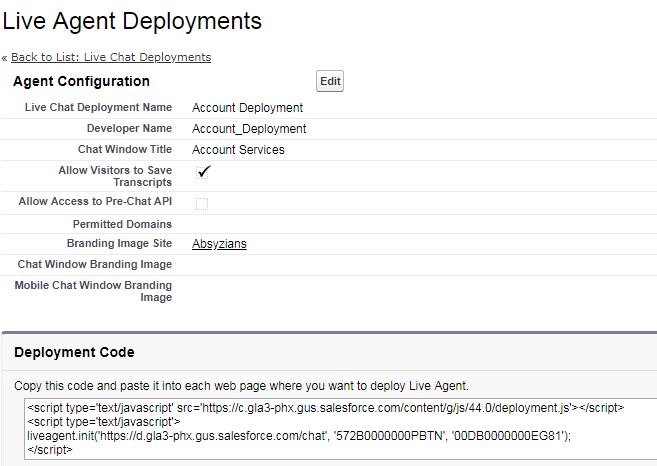
6. Live Agent Deployment:
From quick find in setup enter “Deployments” click on live agent deployments, click new.
Enter your deployment requirements and then click save. After clicking on save, a deployment code is auto-generated. You can copy the code and paste it onto your website HTML, where you want to deploy your live agent.
Once you have created the chat button and deployed the live agent, next all you have to do is copy the auto-generated code of the chat button and the deployment code, in a Visualforce page in the developer console.
Paste the chat button code first and then paste the deployment code.
The code should look like:
<apex:page>
<chat button code>
<deployment code>
<apex:page>
Sample code:
[sourcecode language=”javascript”]
<apex:page >
<img id=”liveagent_button_online_573B0000000PBTN”
style=”display: none; border: 0px none; cursor: pointer”
onclick=”liveagent.startChat(‘573B0000000PBTN’)”
src=”https://absyzians.force.com/service/resource/1537343866000/onlineimage2″ />
<img id=”liveagent_button_offline_573B0000000PBTN”
style=”display: none; border: 0px none; “
src=”https://absyzians.force.com/service/resource/1537344024000/OfflineImage1″ />
<script type=”text/javascript”>
if (!window._laq) { window._laq = []; }
window._laq.push(function(){liveagent.showWhenOnline(‘573B0000000PBTN’, document.getElementById(‘liveagent_button_online_573B0000000PBTN’));
liveagent.showWhenOffline(‘573B0000000PBTN’, document.getElementById(‘liveagent_button_offline_573B0000000PBTN’));
});</script>
<script type=’text/javascript’ src=’https://c.gla3-phx.gus.salesforce.com/content/g/js/44.0/deployment.js’></script>
<script type=’text/javascript’>
liveagent.init(‘https://d.gla3-phx.gus.salesforce.com/chat’, ‘572B0000000PBTN’, ’00DB0000000EG81′);
</script>
</apex:page>
[/sourcecode]
In order to test the live agent, create a Sample Service Console App. From the Quick Find search App and under create, App click on it, Click New and select Console App.

After Specifying your Configurations, while configuring Live Agent Settings in the app, make sure to check the Include Live Agent Settings Checkbox. And then configure the live agent accordingly.
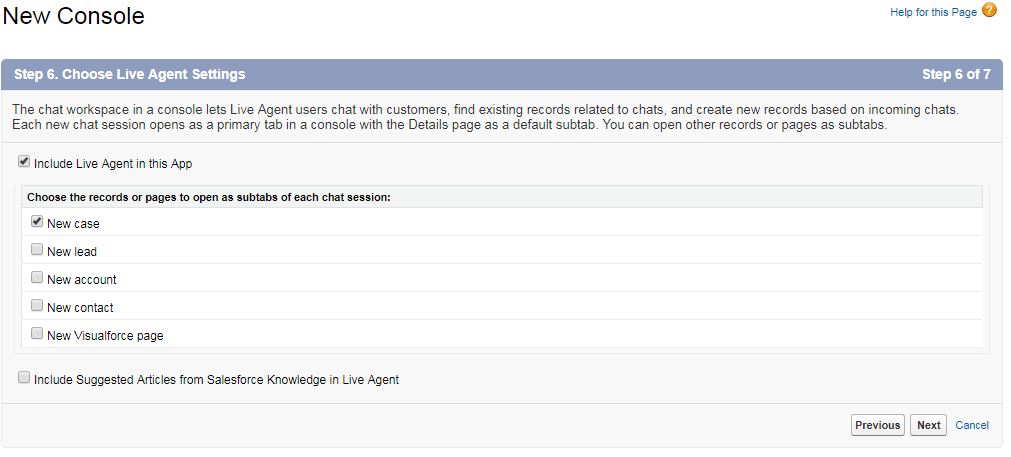
Click Next and assign the Sample App to the profile on which you have configured the live agent.
You can also assign the app to different profiles if live agent is enabled for those.
Click Save.
In order to test the live agent, open your sample app. When you open your App, you can see the live agent window below, click on it to initiate the chat.
In this case, I have created the live agent for Account Services so you can see some account records. And I have configured the agent in a way, that an end user can raise a case, and reach out to account service agent.
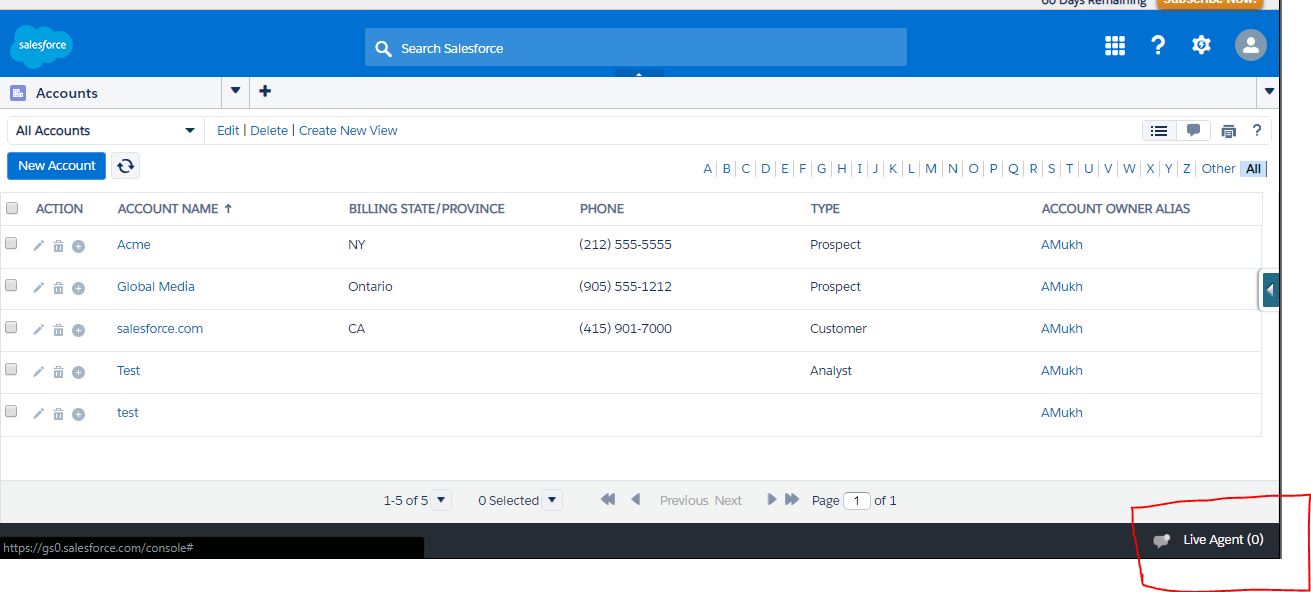
Once, everything is configured correctly, click on the preview button of your VisualForce page, and you’ll be redirected to the chat home page.
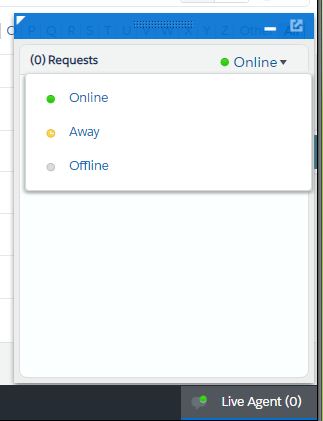
The Service Agent is provided with options of being Online, Away and Offline by default configuration.
If the Service Agent chooses to be online, an image is displayed on the chat home page. Online and Offline Images can be configured while creating chat buttons.
Sample Image when the agent is online:

When the user clicks on the online image, a chat is initiated and a request is sent to the service agent for acceptance of chat.
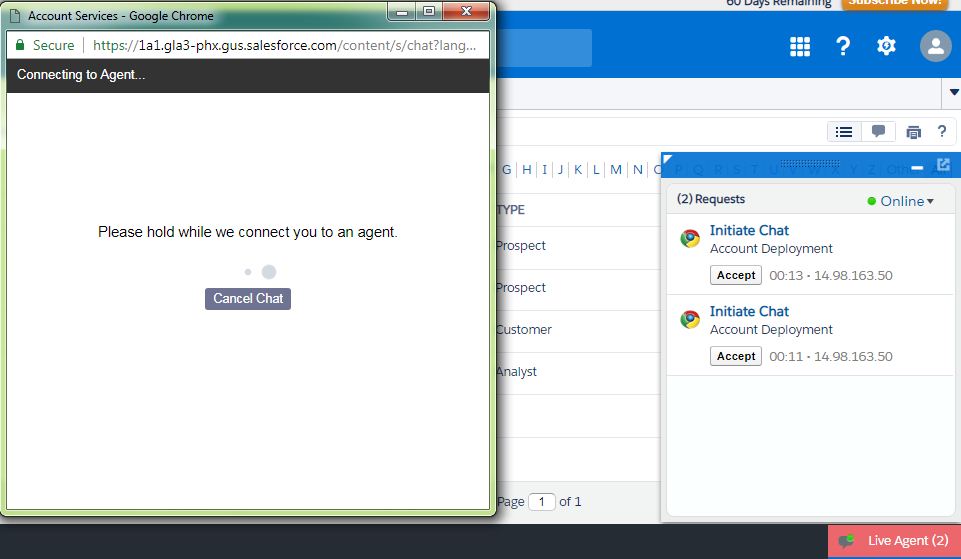
Here, the account services window is the window for the user.
Once, the agent accepts the request, the chat is initiated as shown in the image below.
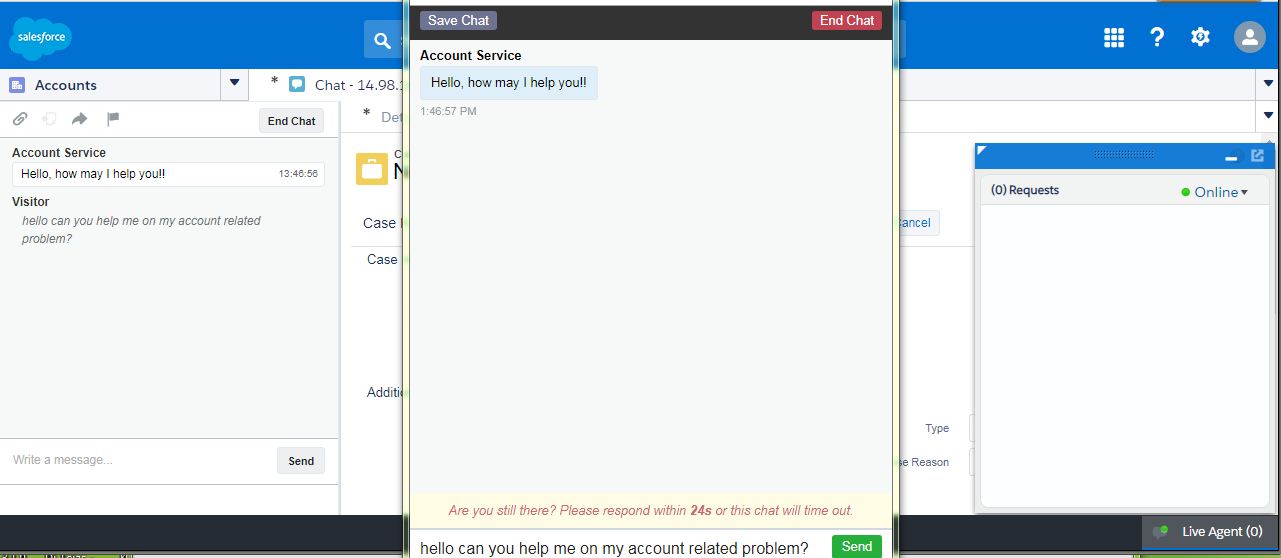
Here before the user types in and clicks on the send button, the service agent can see whatever the user types in and can be ready with the response.
As, here during live agent deployment we have enabled the sneak peak, which allows the service agent to see texts from the user before they click on send. Thus helping the agents to be responsive and fast. You can also enable time out for chats while configuring the chat button.
Once, the user clicks on end chat, the chat is closed.
An agent may also close the chat/ transfer it to other service agents for appropriate cases. You can configure it accordingly while deployment of the live agent.
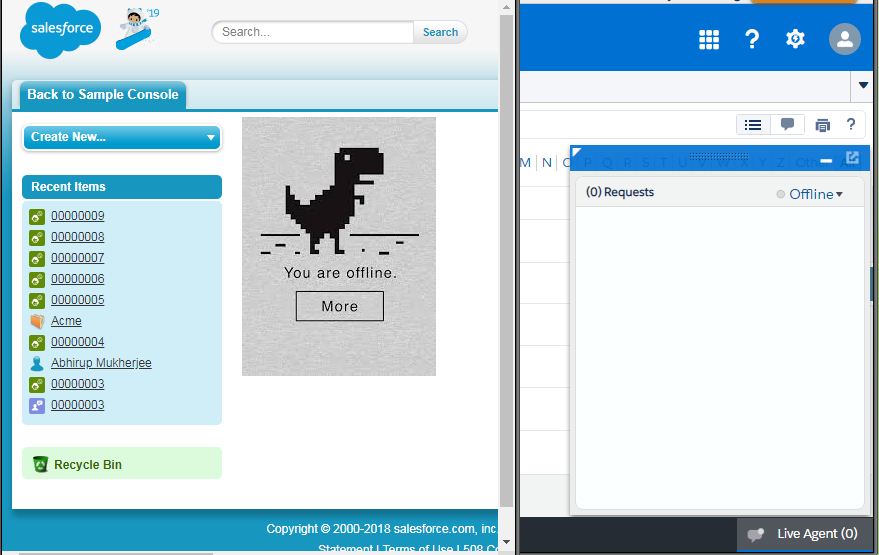
When the Service Agent is offline, an offline image is displayed on the home chat page.
Ultimately, Customer Satisfaction plays a crucial role and thus by setting up a standard live agent you can help your users out any time, efficiently and easily.
Resource: Salesforce Live Agent Guide