Tableau CRM: Add action buttons on Table without XMD

Tableau CRM: Add action buttons on Table without XMD

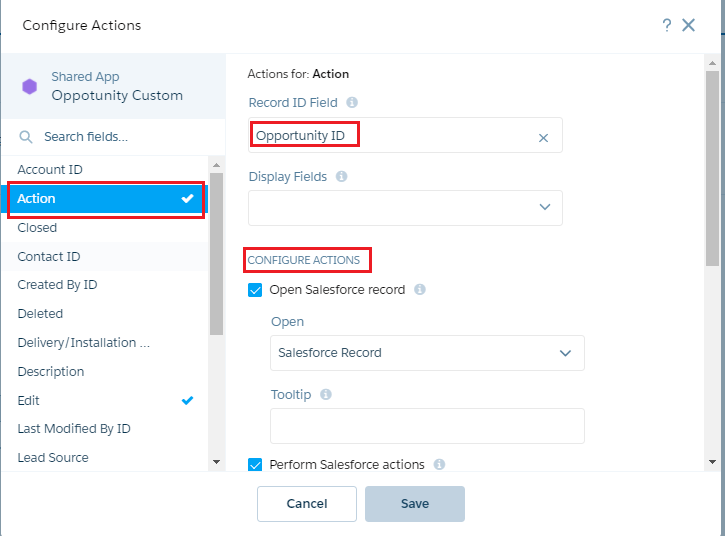
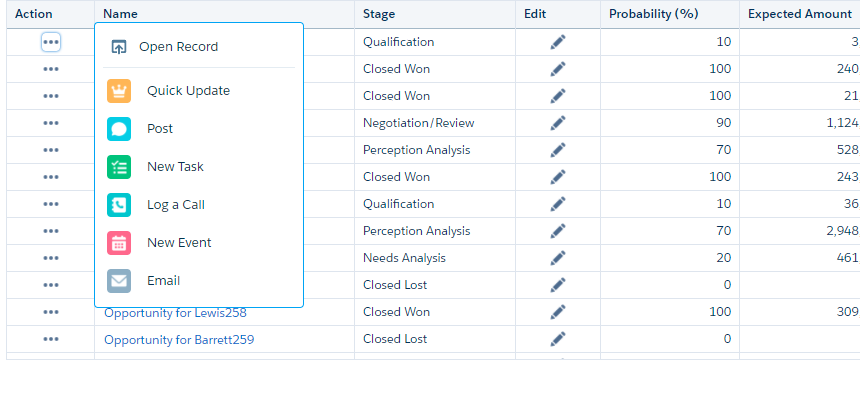
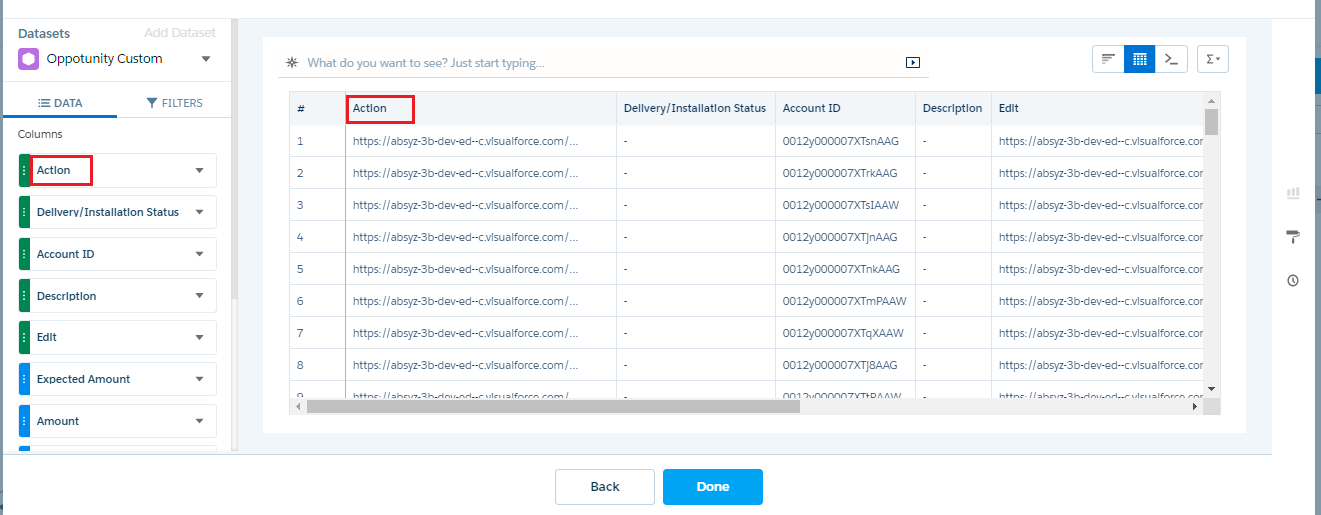
Adding actions to a row in Tableau CRM (formerly Einstein Analytics) table is the coolest feature of Winter ’21 release. In this blog we will create a table with action buttons as shown in the below image without editing the dataset XMD file.

Add the column to the value table. Your computed text value will appear.

Select the column created. You can resize the image accordingly using cell stylings.

Select setup actions -> you can select multiple or single action

Save and preview your changes. Click on the Actions icon, you can see the menu as shown below. The quick action to update your record is ready.

Create a Value Table

Now the actions for the column is setup. Create a Value Table in your dashboard/lens and set the actions for the newly created column. Follow the steps below to setup.

Add the column to the value table. Your computed text value will appear.

Select the column created. You can resize the image accordingly using cell stylings.

Select setup actions -> you can select multiple or single action

Save and preview your changes. Click on the Actions icon, you can see the menu as shown below. The quick action to update your record is ready.

Enable Actions

Create a quick action in salesforce to update the record in the object needed eg., Opportunity and add it to the page layout. In Analytics tool select actions to the new columns added to the dataset as shown below.

Create a Value Table

Now the actions for the column is setup. Create a Value Table in your dashboard/lens and set the actions for the newly created column. Follow the steps below to setup.

Add the column to the value table. Your computed text value will appear.

Select the column created. You can resize the image accordingly using cell stylings.

Select setup actions -> you can select multiple or single action

Save and preview your changes. Click on the Actions icon, you can see the menu as shown below. The quick action to update your record is ready.

In Dataflow: Add a computed field

To add a compute field to the dataset, you can use Dataflow or Recipe. Here we are using a dataflow to add the custom computed field. Creating Action field in the compute expression node. Compute field contains concatenated string as: “[static resource URL]” + “v=1&[any variable name]=[Id]”. So the output for the dataset would be like: “[static resource URL]” + “v=1&oppId=006xx00000xxxxxxx0”.

Enable Actions

Create a quick action in salesforce to update the record in the object needed eg., Opportunity and add it to the page layout. In Analytics tool select actions to the new columns added to the dataset as shown below.

Create a Value Table

Now the actions for the column is setup. Create a Value Table in your dashboard/lens and set the actions for the newly created column. Follow the steps below to setup.

Add the column to the value table. Your computed text value will appear.

Select the column created. You can resize the image accordingly using cell stylings.

Select setup actions -> you can select multiple or single action

Save and preview your changes. Click on the Actions icon, you can see the menu as shown below. The quick action to update your record is ready.

Create an image URL

Upload the image you wanted show in the column to the static resource. In the above image we have used slds icons that is uploaded to the static resource. Once you have created the static resource you will find an option View file. Click on it to get the resource link that we will be using in the next step in place of URL (where ever mentioned).

In Dataflow: Add a computed field

To add a compute field to the dataset, you can use Dataflow or Recipe. Here we are using a dataflow to add the custom computed field. Creating Action field in the compute expression node. Compute field contains concatenated string as: “[static resource URL]” + “v=1&[any variable name]=[Id]”. So the output for the dataset would be like: “[static resource URL]” + “v=1&oppId=006xx00000xxxxxxx0”.

Enable Actions

Create a quick action in salesforce to update the record in the object needed eg., Opportunity and add it to the page layout. In Analytics tool select actions to the new columns added to the dataset as shown below.

Create a Value Table

Now the actions for the column is setup. Create a Value Table in your dashboard/lens and set the actions for the newly created column. Follow the steps below to setup.

Add the column to the value table. Your computed text value will appear.

Select the column created. You can resize the image accordingly using cell stylings.

Select setup actions -> you can select multiple or single action

Save and preview your changes. Click on the Actions icon, you can see the menu as shown below. The quick action to update your record is ready.

Leave a Comment

Your email address will not be published. Required fields are marked *

Recent Posts

Salesforce adoption
Why Salesforce Rollouts Fail — and How to Fix Them: The Psychology Behind Successful Adoption
Beyond the Dashboard: What Great Salesforce Reporting Really Looks Like
Salesforce + Legacy Systems
Salesforce + Legacy Systems: Making Digital Transformation Work in the Real World
Do You Really Need Data 360?
Do You Really Need Data 360? A Reality Check for Businesses in 2025
Agentforce 360
Agentforce 360: The New AI Core of Salesforce Enterprises
Scroll to Top